
LLM
Definition
Invokes the capabilities of large language models to process information input by users in the "Start" node (natural language, uploaded files, or images) and provide effective response information.

Scenarios
LLM is the core node of Chatflow/Workflow, utilizing the conversational/generative/classification/processing capabilities of large language models to handle a wide range of tasks based on given prompts and can be used in different stages of workflows.
Intent Recognition: In customer service scenarios, identifying and classifying user inquiries to guide downstream processes.
Text Generation: In content creation scenarios, generating relevant text based on themes and keywords.
Content Classification: In email batch processing scenarios, automatically categorizing emails, such as inquiries/complaints/spam.
Text Conversion: In translation scenarios, translating user-provided text into a specified language.
Code Generation: In programming assistance scenarios, generating specific business code or writing test cases based on user requirements.
RAG: In knowledge base Q&A scenarios, reorganizing retrieved relevant knowledge to respond to user questions.
Image Understanding: Using multimodal models with vision capabilities to understand and answer questions about the information within images.
File Analysis: In file processing scenarios, use LLMs to recognize and analyze the information contained within files.
By selecting the appropriate model and writing prompts, you can build powerful and reliable solutions within Chatflow/Workflow.
How to Configure

Configuration Steps:
Select a Model: Dify supports major global models, including OpenAI's GPT series, Anthropic's Claude series, and Google's Gemini series. Choosing a model depends on its inference capability, cost, response speed, context window, etc. You need to select a suitable model based on the scenario requirements and task type.
Configure Model Parameters: Model parameters control the generation results, such as temperature, TopP, maximum tokens, response format, etc. To facilitate selection, the system provides three preset parameter sets: Creative, Balanced, and Precise.
Write Prompts: The LLM node offers an easy-to-use prompt composition page. Selecting a chat model or completion model will display different prompt composition structures.
Advanced Settings: You can enable memory, set memory windows, and use the Jinja-2 template language for more complex prompts.
If you are using Dify for the first time, you need to complete the model configuration in System Settings-Model Providers before selecting a model in the LLM node.
Writing Prompts
In the LLM node, you can customize the model input prompts. If you select a chat model, you can customize the System/User/Assistant sections.
Prompt Generator
If you're struggling to come up with effective system prompts (System), you can use the Prompt Generator to quickly create prompts suitable for your specific business scenarios, leveraging AI capabilities.

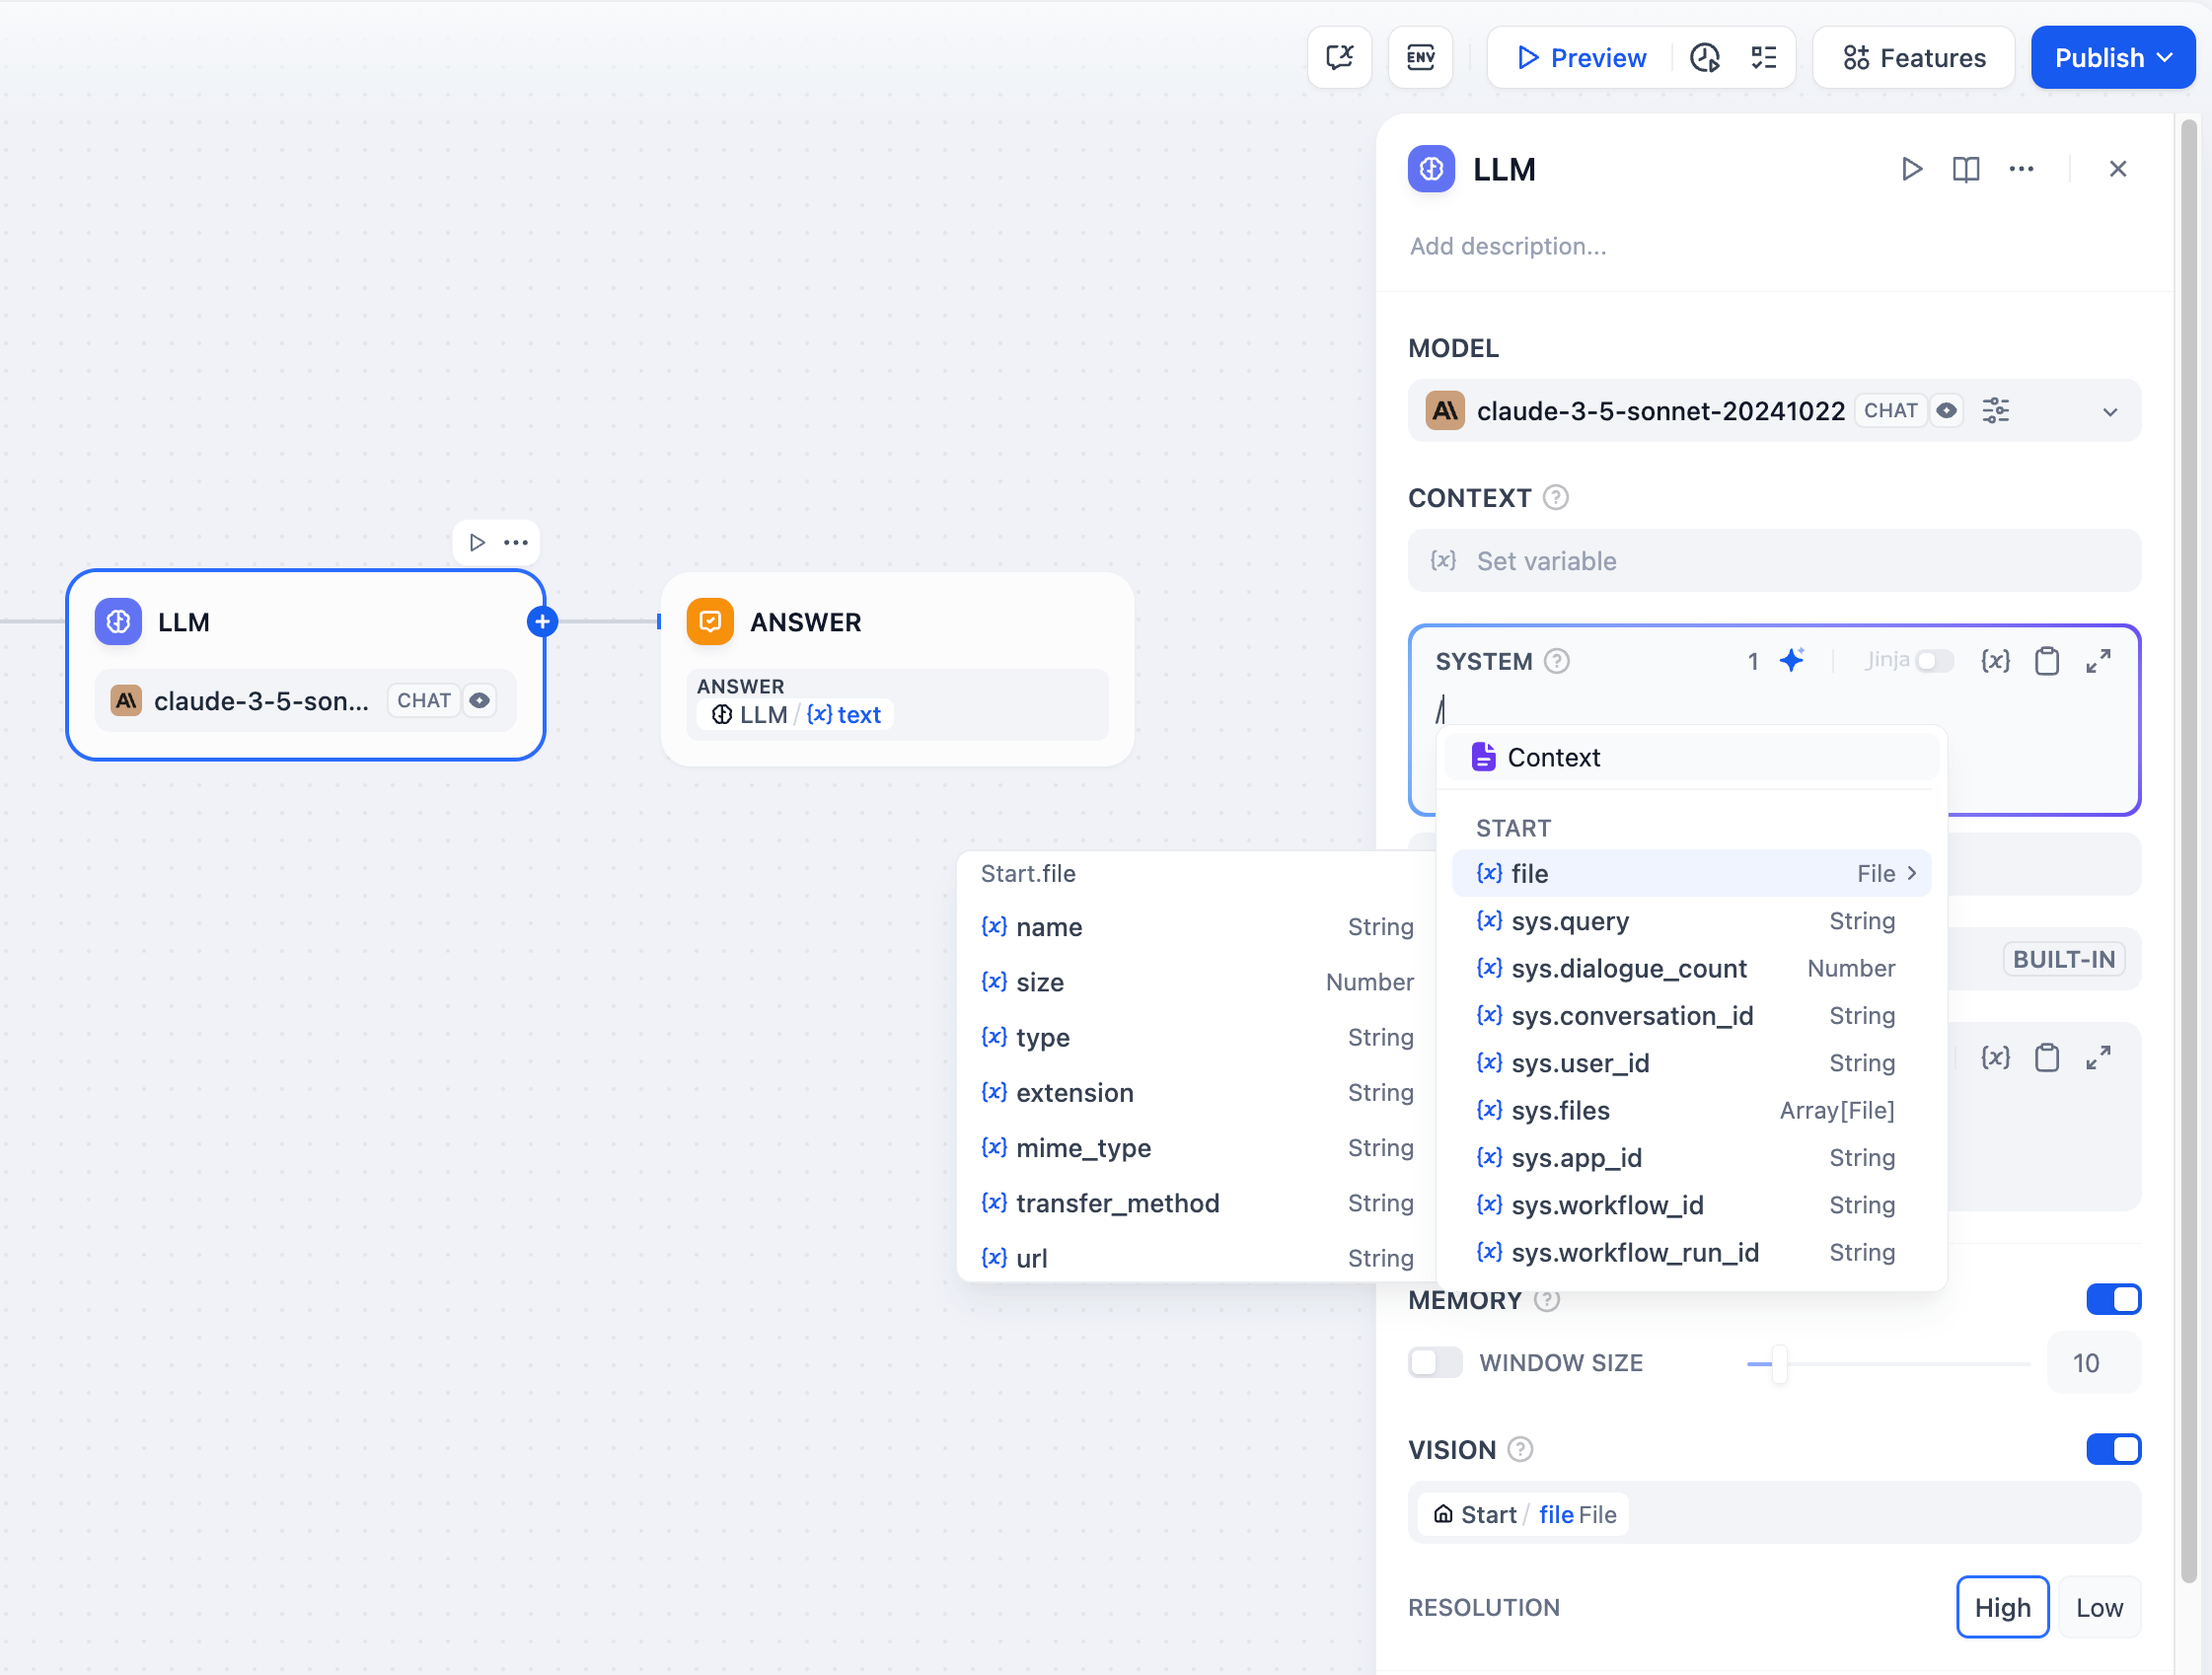
In the prompt editor, you can call out the variable insertion menu by typing / or { to insert special variable blocks or upstream node variables into the prompt as context content.

Explanation of Special Variables
Context Variables
Context variables are a special type of variable defined within the LLM node, used to insert externally retrieved text content into the prompt.

In common knowledge base Q&A applications, the downstream node of knowledge retrieval is typically the LLM node. The output variable result of knowledge retrieval needs to be configured in the context variable within the LLM node for association and assignment. After association, inserting the context variable at the appropriate position in the prompt can incorporate the externally retrieved knowledge into the prompt.
This variable can be used not only as external knowledge introduced into the prompt context for LLM responses but also supports the application's citation and attribution feature due to its data structure containing segment reference information.
If the context variable is associated with a common variable from an upstream node, such as a string type variable from the start node, the context variable can still be used as external knowledge, but the citation and attribution feature will be disabled.
File Variables
Some LLMs, such as Claude 3.5 Sonnet, now support direct processing of file content, enabling the use of file variables in prompts. To prevent potential issues, application developers should verify the supported file types on the LLM's official website before utilizing the file variable.
Refer to File Upload for guidance on building a Chatflow/Workflow application with file upload functionality.
Conversation History
To achieve conversational memory in text completion models (e.g., gpt-3.5-turbo-Instruct), Dify designed the conversation history variable in the original Prompt Expert Mode (discontinued). This variable is carried over to the LLM node in Chatflow, used to insert chat history between the AI and the user into the prompt, helping the LLM understand the context of the conversation.
The conversation history variable is not widely used and can only be inserted when selecting text completion models in Chatflow.

Model Parameters
The parameters of the model affect the output of the model. Different models have different parameters. The following figure shows the parameter list for gpt-4.

The main parameter terms are explained as follows:
Temperature: Usually a value between 0-1, it controls randomness. The closer the temperature is to 0, the more certain and repetitive the results; the closer it is to 1, the more random the results.
Top P: Controls the diversity of the results. The model selects from candidate words based on probability, ensuring that the cumulative probability does not exceed the preset threshold P.
Presence Penalty: Used to reduce the repetitive generation of the same entity or information by imposing penalties on content that has already been generated, making the model inclined to generate new or different content. As the parameter value increases, greater penalties are applied in subsequent generations to content that has already been generated, lowering the likelihood of repeating content.
Frequency Penalty: Imposes penalties on words or phrases that appear too frequently by reducing their probability of generation. With an increase in parameter value, greater penalties are imposed on frequently occurring words or phrases. Higher parameter values reduce the frequency of these words, thereby increasing the lexical diversity of the text.
If you do not understand what these parameters are, you can choose to load presets and select from the three presets: Creative, Balanced, and Precise.

Advanced Features
Memory: When enabled, each input to the intent classifier will include chat history from the conversation to help the LLM understand the context and improve question comprehension in interactive dialogues.
Memory Window: When the memory window is closed, the system dynamically filters the amount of chat history passed based on the model's context window; when open, users can precisely control the amount of chat history passed (in terms of numbers).
Conversation Role Name Settings: Due to differences in model training stages, different models adhere to role name instructions differently, such as Human/Assistant, Human/AI, Human/Assistant, etc. To adapt to the prompt response effects of multiple models, the system provides conversation role name settings. Modifying the role name will change the role prefix in the conversation history.
Jinja-2 Templates: The LLM prompt editor supports Jinja-2 template language, allowing you to leverage this powerful Python template language for lightweight data transformation and logical processing. Refer to the official documentation.
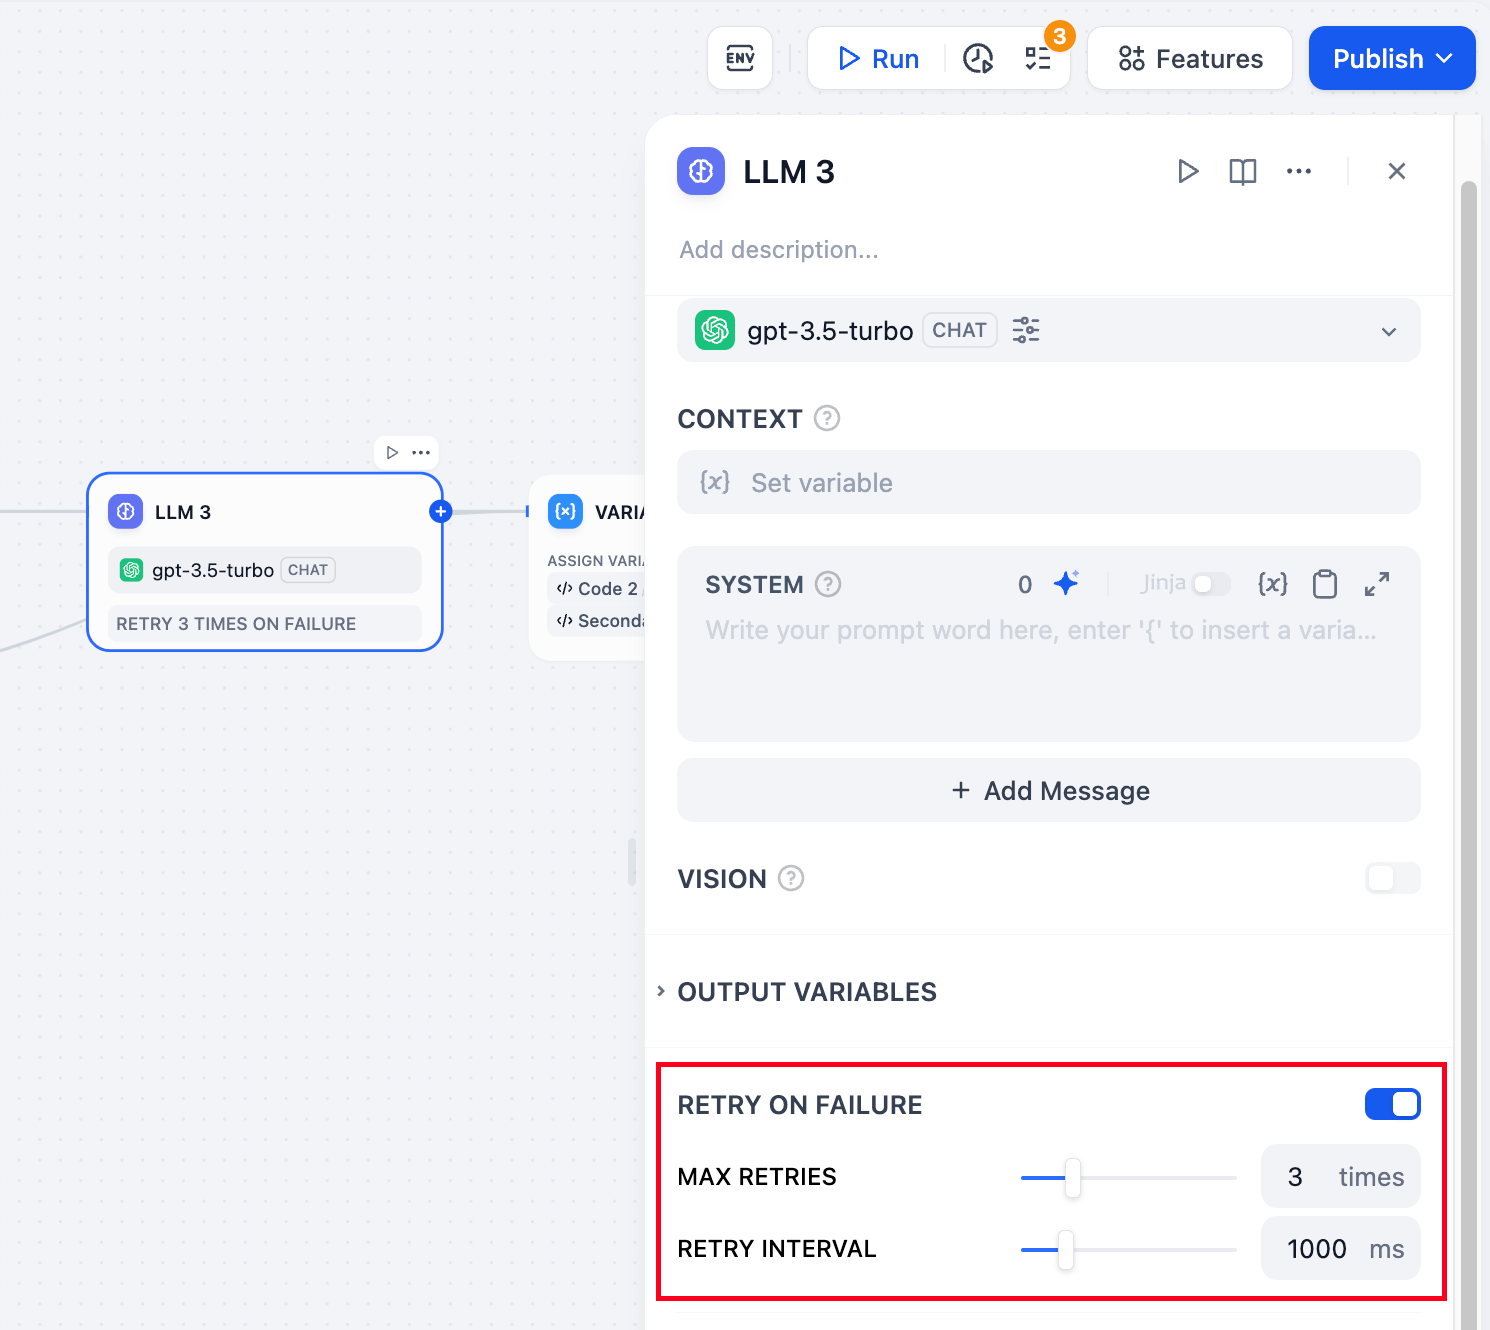
Retry on Failure: For some exceptions that occur in the node, it is usually sufficient to retry the node again. When the error retry function is enabled, the node will automatically retry according to the preset strategy when an error occurs. You can adjust the maximum number of retries and the interval between each retry to set the retry strategy.
The maximum number of retries is 10
The maximum retry interval is 5000 ms
Error Handling: Provides diverse node error handling strategies that can throw error messages when the current node fails without interrupting the main process, or continue completing tasks through backup paths. For detailed information, please refer to the Error Handling.
Structured Outputs: Ensures LLM returns data in a usable, stable, and predictable format, helping users to control exactly how their LLM nodes returns data.
JSON Schema Editor
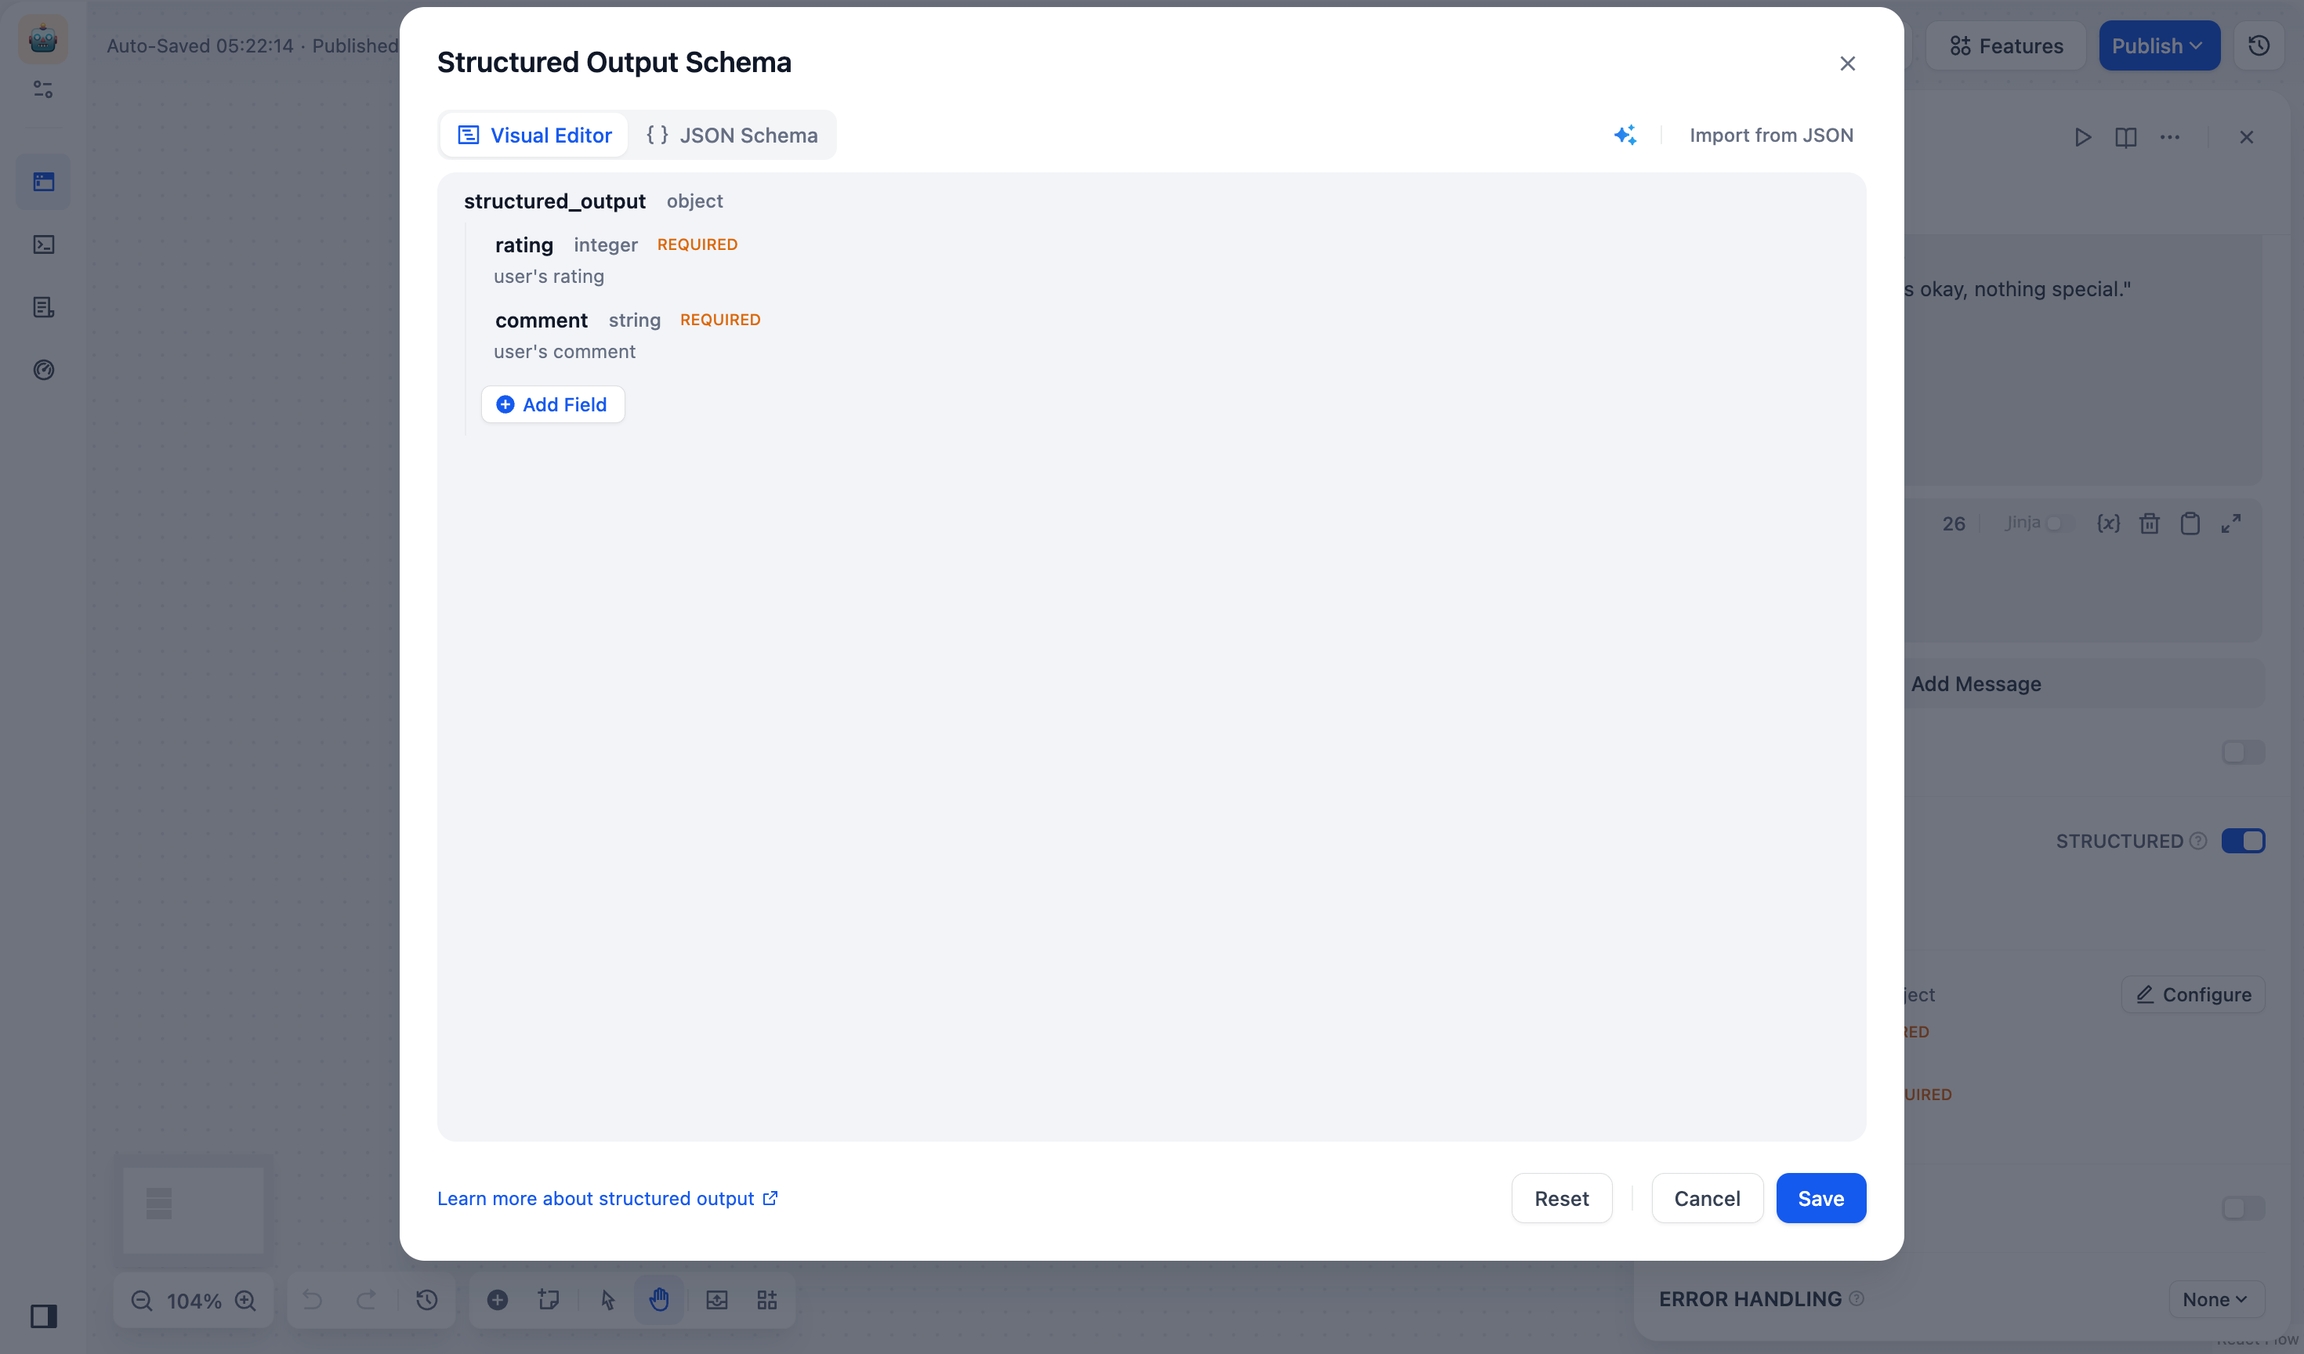
The JSON Schema Editor in LLM nodes lets you define how you want your data structured. You can use either the Visual Editor for a user-friendly experience or the JSON Schema for more precise control.
JSON Schema Editor supports structured outputs across all models:
Models with Native Support: Can directly use JSON Schema definitions.
Models without Native Support: Not all models handle structured outputs reliably. We wll include your schema in the prompt, but response formatting may vary by model.
Get Started
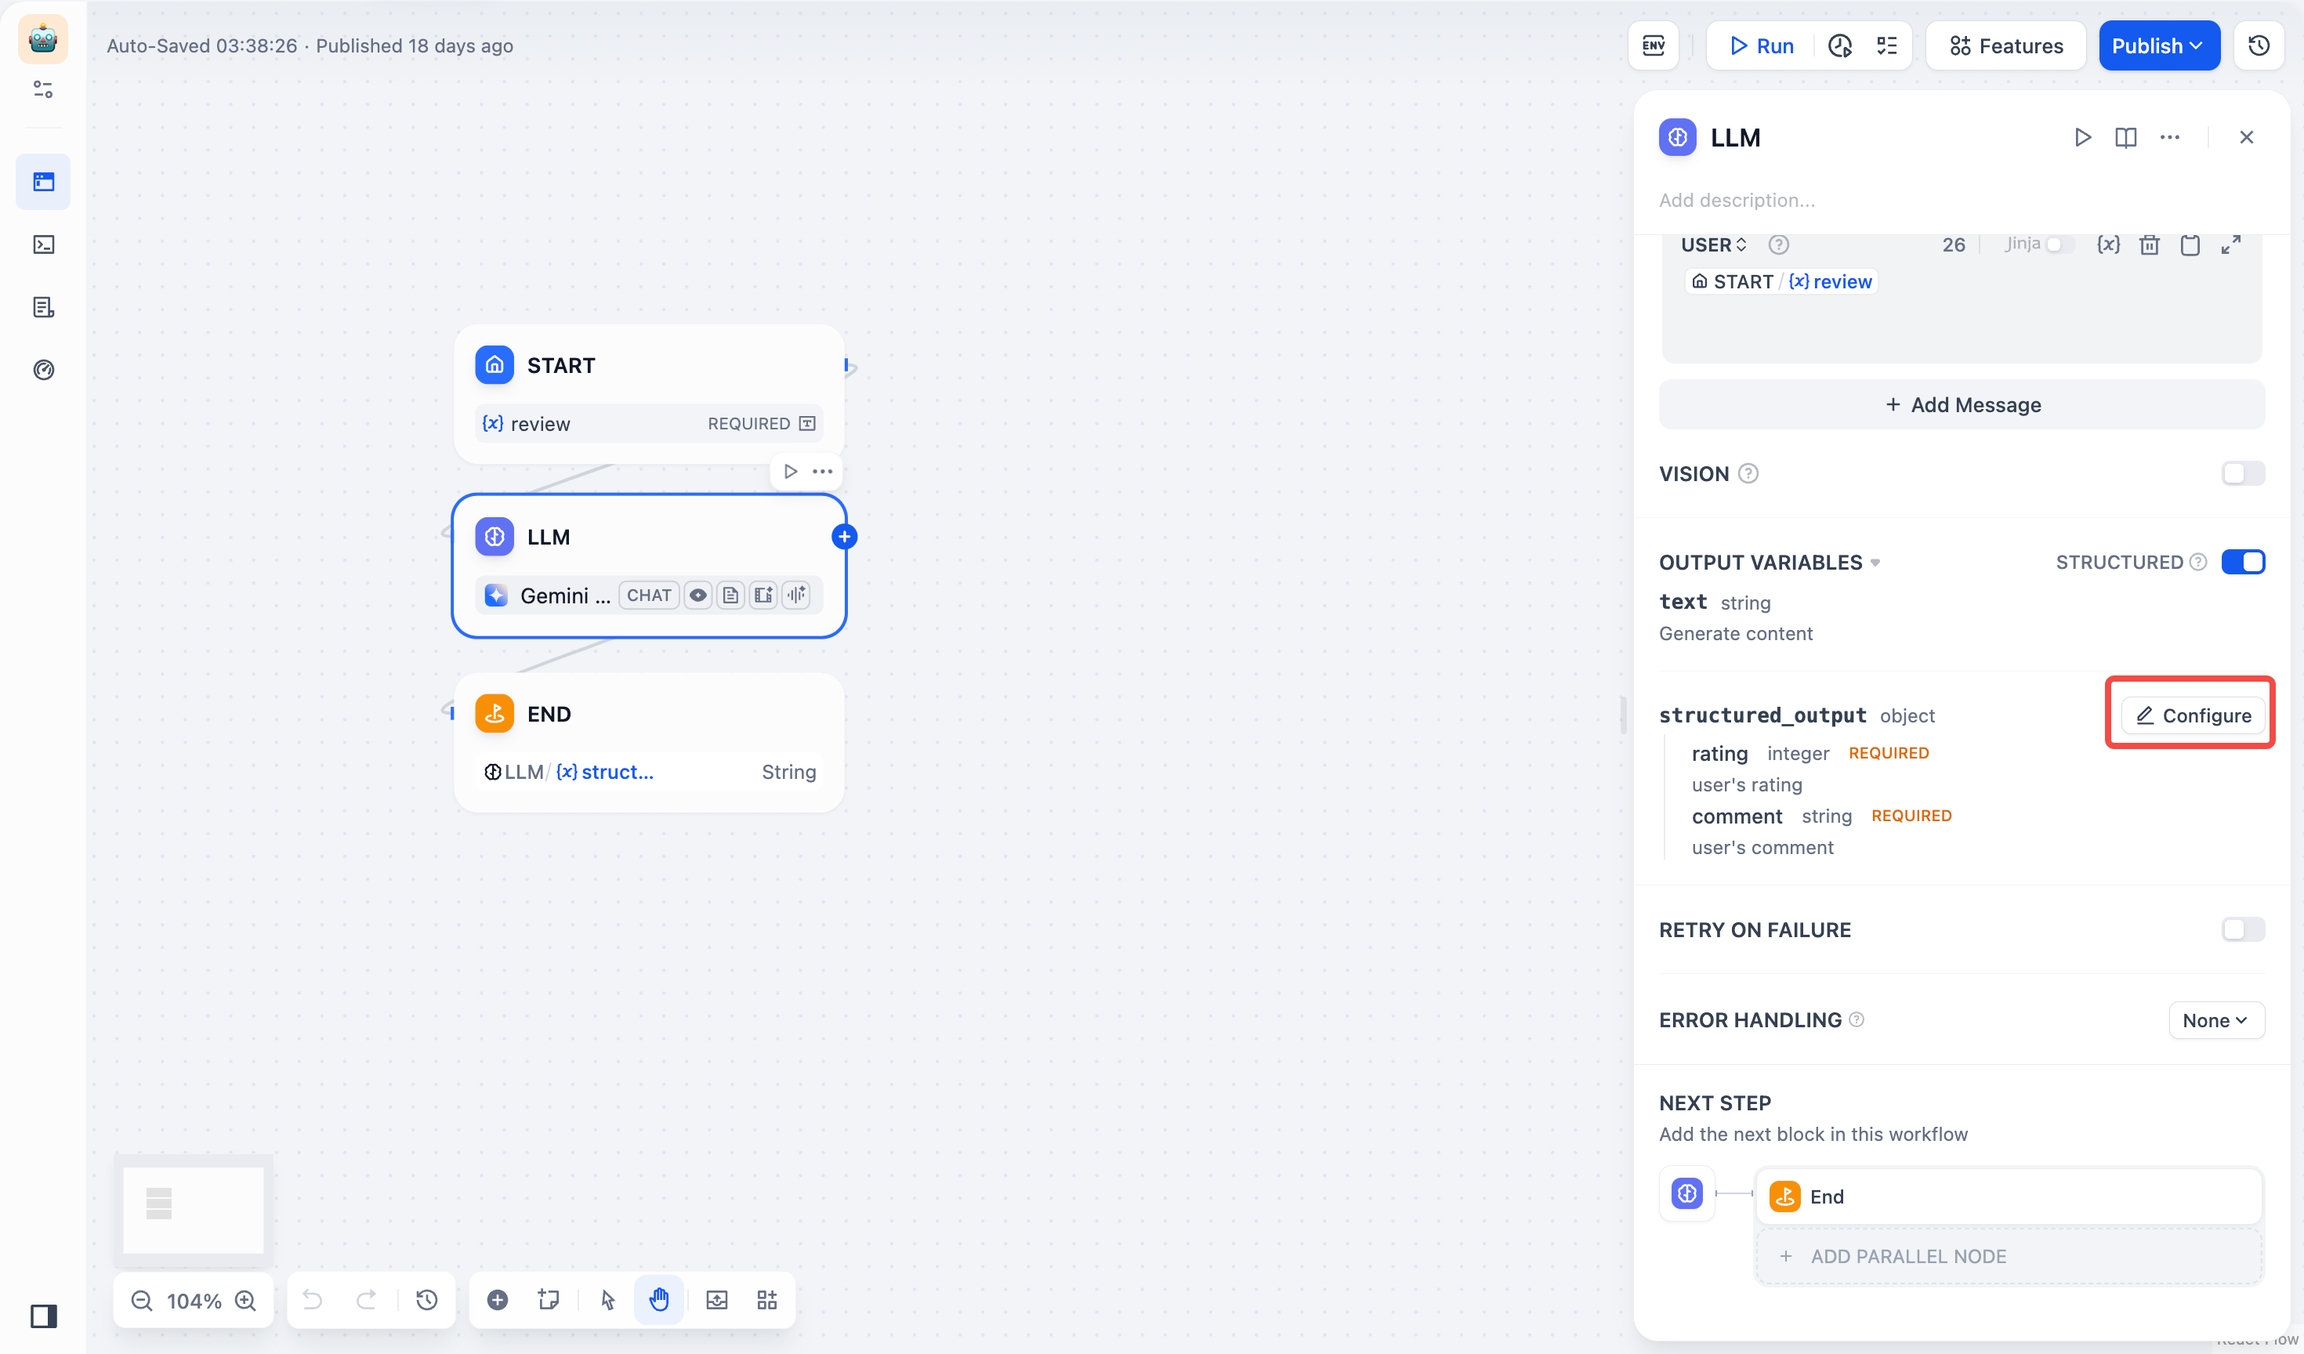
Access the editor through LLM Node > Output Variables > Structured > Configure. You can switch between visual and JSON Schema editing modes.
Visual Editor
When to Use
For simple fields such as
name,email,agewithout nested structuresIf you prefer a drag-and-drop way over writing JSON
When you need to quickly iterate on your schema structure
Add Fields
Click Add Field and set parameters below:
(required) Field Name
(required) Field Type: Choose from string, number, object, array, etc.
Note: Object and array type fields can contain child fields.
Description: Helps the LLM understand what the field means.
Required: Ensures the LLM always includes this field in its output.
Enum: Restricts possible values. For example, to allow only red, green, blue:
Manage Fields
To Edit: Hover over a field and click the Edit icon.
To Delete: Hover over a field and click the Delete icon.
Note: Deleting an object or array removes all its child fields.
Import from JSON
Click Import from JSON and paste your example:
Click Submit to convert it into a schema.
Generate with AI
Click the AI Generate icon, select a model (like GPT-4o), and describe what you need:
"I need a JSON Schema for user profiles with username (string), age (number), and interests (array)."
Click Generate to create a schema:
JSON Schema
When to Use
For complex fields that need nesting, (e.g.,
order_details,product_lists)When you want to import and modify existing JSON Schemas or API examples
When you need advanced schema features, such as
pattern(regex matching) oroneOf(multiple type support)When you want to fine-tune an AI-generated schema to fit your exact requirements

Add Fields
Click Import from JSON and add your field structure:
Click Save. Your schema will be validated automatically.
Manage Fields: Edit field types, descriptions, default values, etc. in the JSON code box, and then click Save.
Import from JSON
Click Import from JSON and paste your example:
Click Submit to convert it into a schema.
Generate with AI
Click the AI Generate icon, select a model (like GPT-4o), and describe what you need:
"I need a JSON Schema for user profiles with username (string), age (number), and interests (array)."
Click Generate to create a schema:
Use Cases
Reading Knowledge Base Content
To enable workflow applications to read "Knowledge Base" content, such as building an intelligent customer service application, please follow these steps:
Add a knowledge base retrieval node upstream of the LLM node;
Fill in the output variable
resultof the knowledge retrieval node into the context variable of the LLM node;Insert the context variable into the application prompt to give the LLM the ability to read text within the knowledge base.

The result variable output by the Knowledge Retrieval Node also includes segmented reference information. You can view the source of information through the Citation and Attribution feature.
Regular variables from upstream nodes can also be filled into context variables, such as string-type variables from the start node, but the Citation and Attribution feature will be ineffective.
Reading Document Files
To enable workflow applications to read document contents, such as building a ChatPDF application, you can follow these steps:
Add a file variable in the "Start" node;
Add a document extractor node upstream of the LLM node, using the file variable as an input variable;
Fill in the output variable
textof the document extractor node into the prompt of the LLM node.
For more information, please refer to File Upload.

Error Handling
When processing information, LLM nodes may encounter errors such as input text exceeding token limits or missing key parameters. Developers can follow these steps to configure exception branches, enabling contingency plans when node errors occur to avoid interrupting the entire flow:
Enable "Error Handling" in the LLM node
Select and configure an error handling strategy
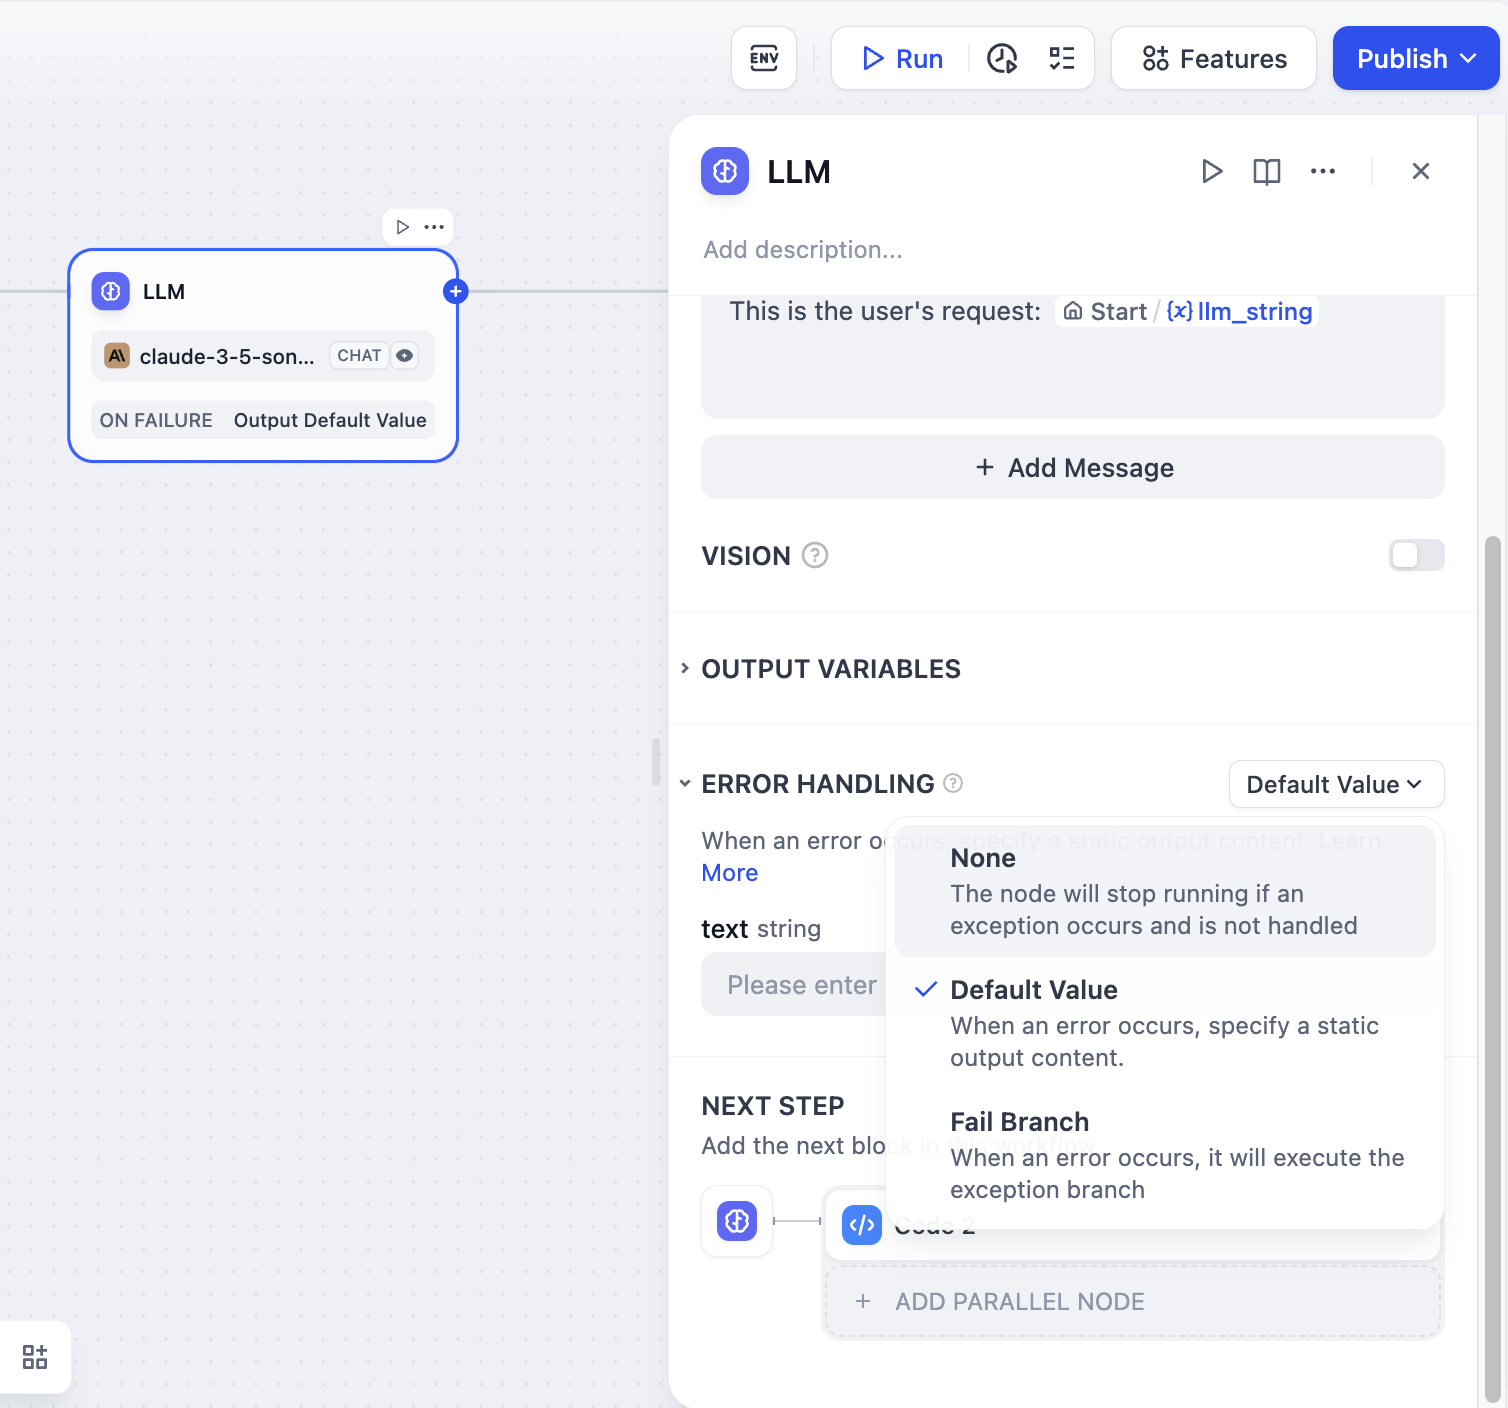
For more information about exception handling methods, please refer to the Error Handling.
Structured Outputs
Case: Customer Information Intake Form
Watch the following video to learn how to use JSON Schema Editor to collect customer information:
Last updated