
Integrate Knowledge Base within Application
Creating an Application Integrated with Knowledge Base
A "Knowledge Base" can be used as an external information source to provide precise answers to user questions via LLM. You can associate an existing knowledge base with any application type in Dify.
Taking a chat assistant as an example, the process is as follows:
Go to Knowledge -- Create Knowledge -- Upload file
Go to Studio -- Create Application -- Select Chatbot
Enter Context, click Add, and select one of the knowledge base created
Use Metadata Filtering to refine document search in your knowledge base
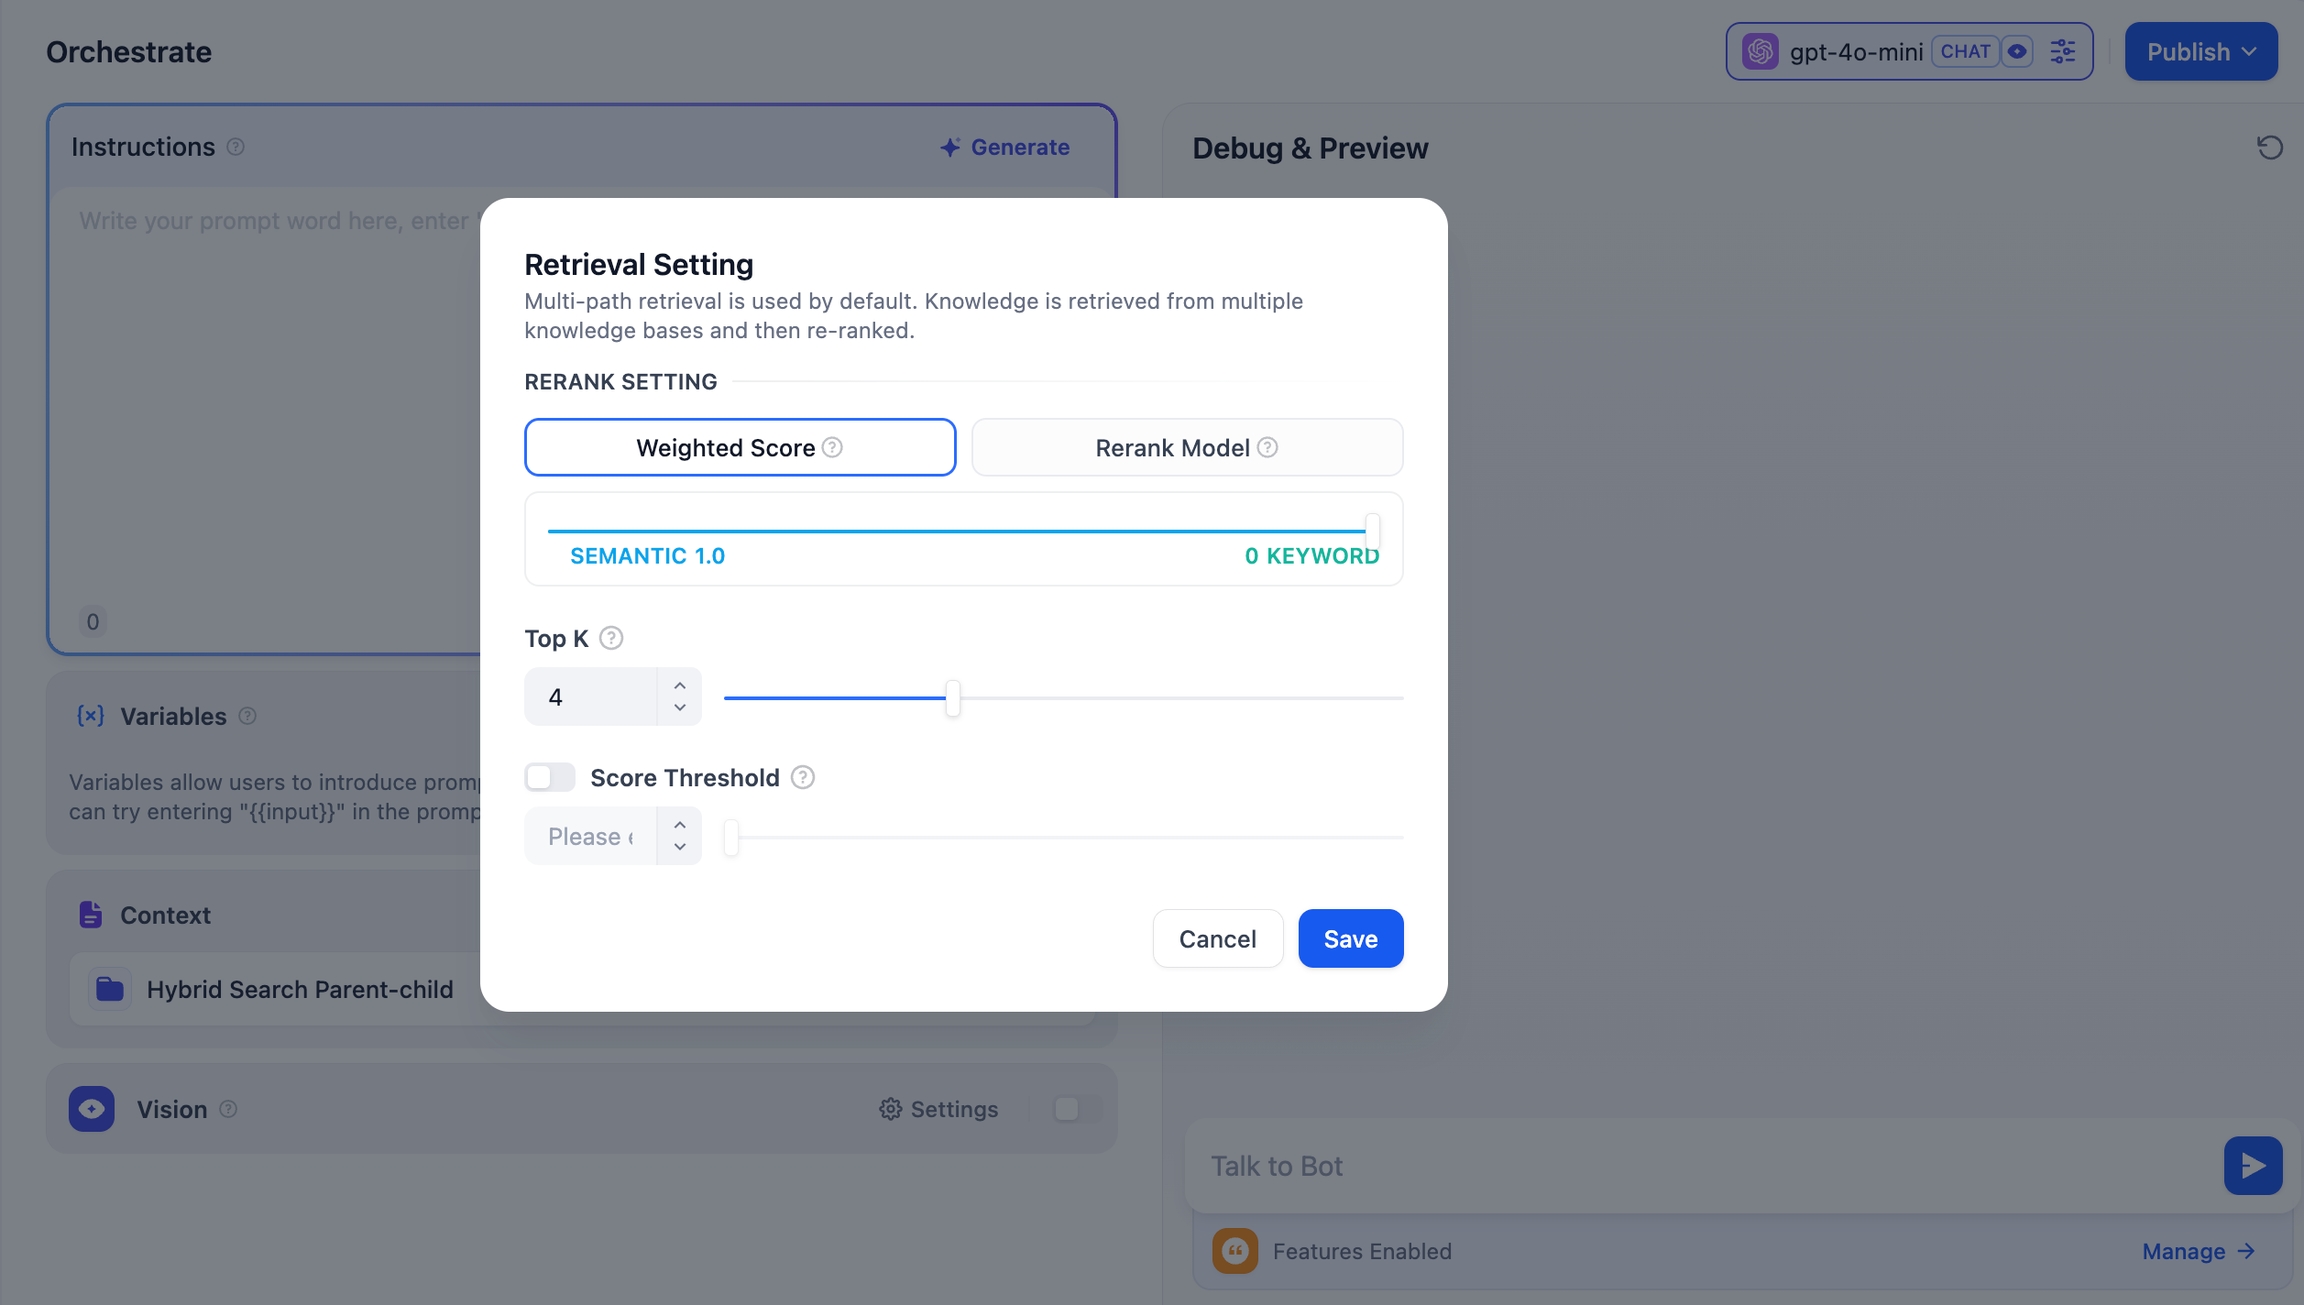
In Context Settings -- Retrieval Setting, configure the Retrieval Setting
Enable Citation and Attribution in Add Features
In Debug and Preview, input user questions related to the knowledge base for debugging
After debugging, click Publish button to make an AI application based on your own knowledge!
Connecting Knowledge and Setting Retrieval Mode
In applications that utilize multiple knowledge bases, it is essential to configure the retrieval mode to enhance the precision of retrieved content. To set the retrieval mode for the knowledge bases, navigate to Context -- Retrieval Settings -- Rerank Setting.
Retrieval Setting
The retriever scans all knowledge bases linked to the application for text content relevant to the user's question. The results are then consolidated. Below is the technical flowchart for the Multi-path Retrieval mode:

This method simultaneously queries all knowledge bases connected in "Context", seeking relevant text chucks across multiple knowledge bases, collecting all content that aligns with the user's question, and ultimately applying the Rerank strategy to identify the most appropriate content to respond to the user. This retrieval approach offers more comprehensive and accurate results by leveraging multiple knowledge bases simultaneously.
For instance, in application A, with three knowledge bases K1, K2, and K3. When a user send a question, multiple relevant pieces of content will be retrieved and combined from these knowledge bases. To ensure the most pertinent content is identified, the Rerank strategy is employed to find the content that best relates to the user's query, enhancing the precision and reliability of the results.
In practical Q&A scenarios, the sources of content and retrieval methods for each knowledge base may differ. To manage the mixed content returned from retrieval, the Rerank strategy acts as a refined sorting mechanism. It ensures that the candidate content aligns well with the user's question, optimizing the ranking of results across multiple knowledge bases to identify the most suitable content, thereby improving answer quality and overall user experience.
Considering the costs associated with using Rerank and the needs of the business, the multi-path retrieval mode provides two Rerank settings:
Weighted Score
This setting uses internal scoring mechanisms and does not require an external Rerank model, thus avoiding any additional processing costs. You can select the most appropriate content matching strategy by adjusting the weight ratio sliders for semantics or keywords.
Semantic Value of 1
This mode activates semantic retrieval only. By utilizing the Embedding model, the search depth can be enhanced even if the exact words from the query do not appear in the knowledge base, as it calculates vector distances to return the relevant content. Furthermore, when dealing with multilingual content, semantic retrieval can capture meanings across different languages, yielding more accurate cross-language search results.
Keyword Value of 1
This mode activates keyword retrieval only. It matches the user's input text against the full text of the knowledge base, making it ideal for scenarios where the user knows the exact information or terminology. This method is resource-efficient, making it suitable for quickly retrieving information from large document repositories.
Custom Keyword and Semantic Weights
In addition to enabling only semantic or keyword retrieval modes, we offer flexible custom Weight Score. You can determine the best weight ratio for your business scenario by continuously adjusting the weights of both.
Rerank Model
The Rerank model is an external scoring system that calculates the relevance score between the user's question and each candidate document provided, improving the results of semantic ranking and returning a list of documents sorted by relevance from high to low.
While this method incurs some additional costs, it is more adept at handling complex knowledge base content, such as content that combines semantic queries and keyword matches, or cases involving multilingual returned content.
Click here to learn more about the Re-ranking.
Dify currently supports multiple Rerank models. To use external Rerank models, you'll need to provide an API Key. Enter the API Key for the Rerank model (such as Cohere, Jina AI, etc.) on the "Model Provider" page.

Adjustable Parameters
TopK: Determines how many text chunks, deemed most similar to the user’s query, are retrieved. It also automatically adjusts the number of chunks based on the chosen model’s context window. The default value is 3, and higher numbers will recall more text chunks.
Score Threshold: Sets the minimum similarity score required for a chunk to be retrieved. Only chunks exceeding this score are retrieved. The default value is 0.5. Higher thresholds demand greater similarity and thus result in fewer chunks being retrieved.
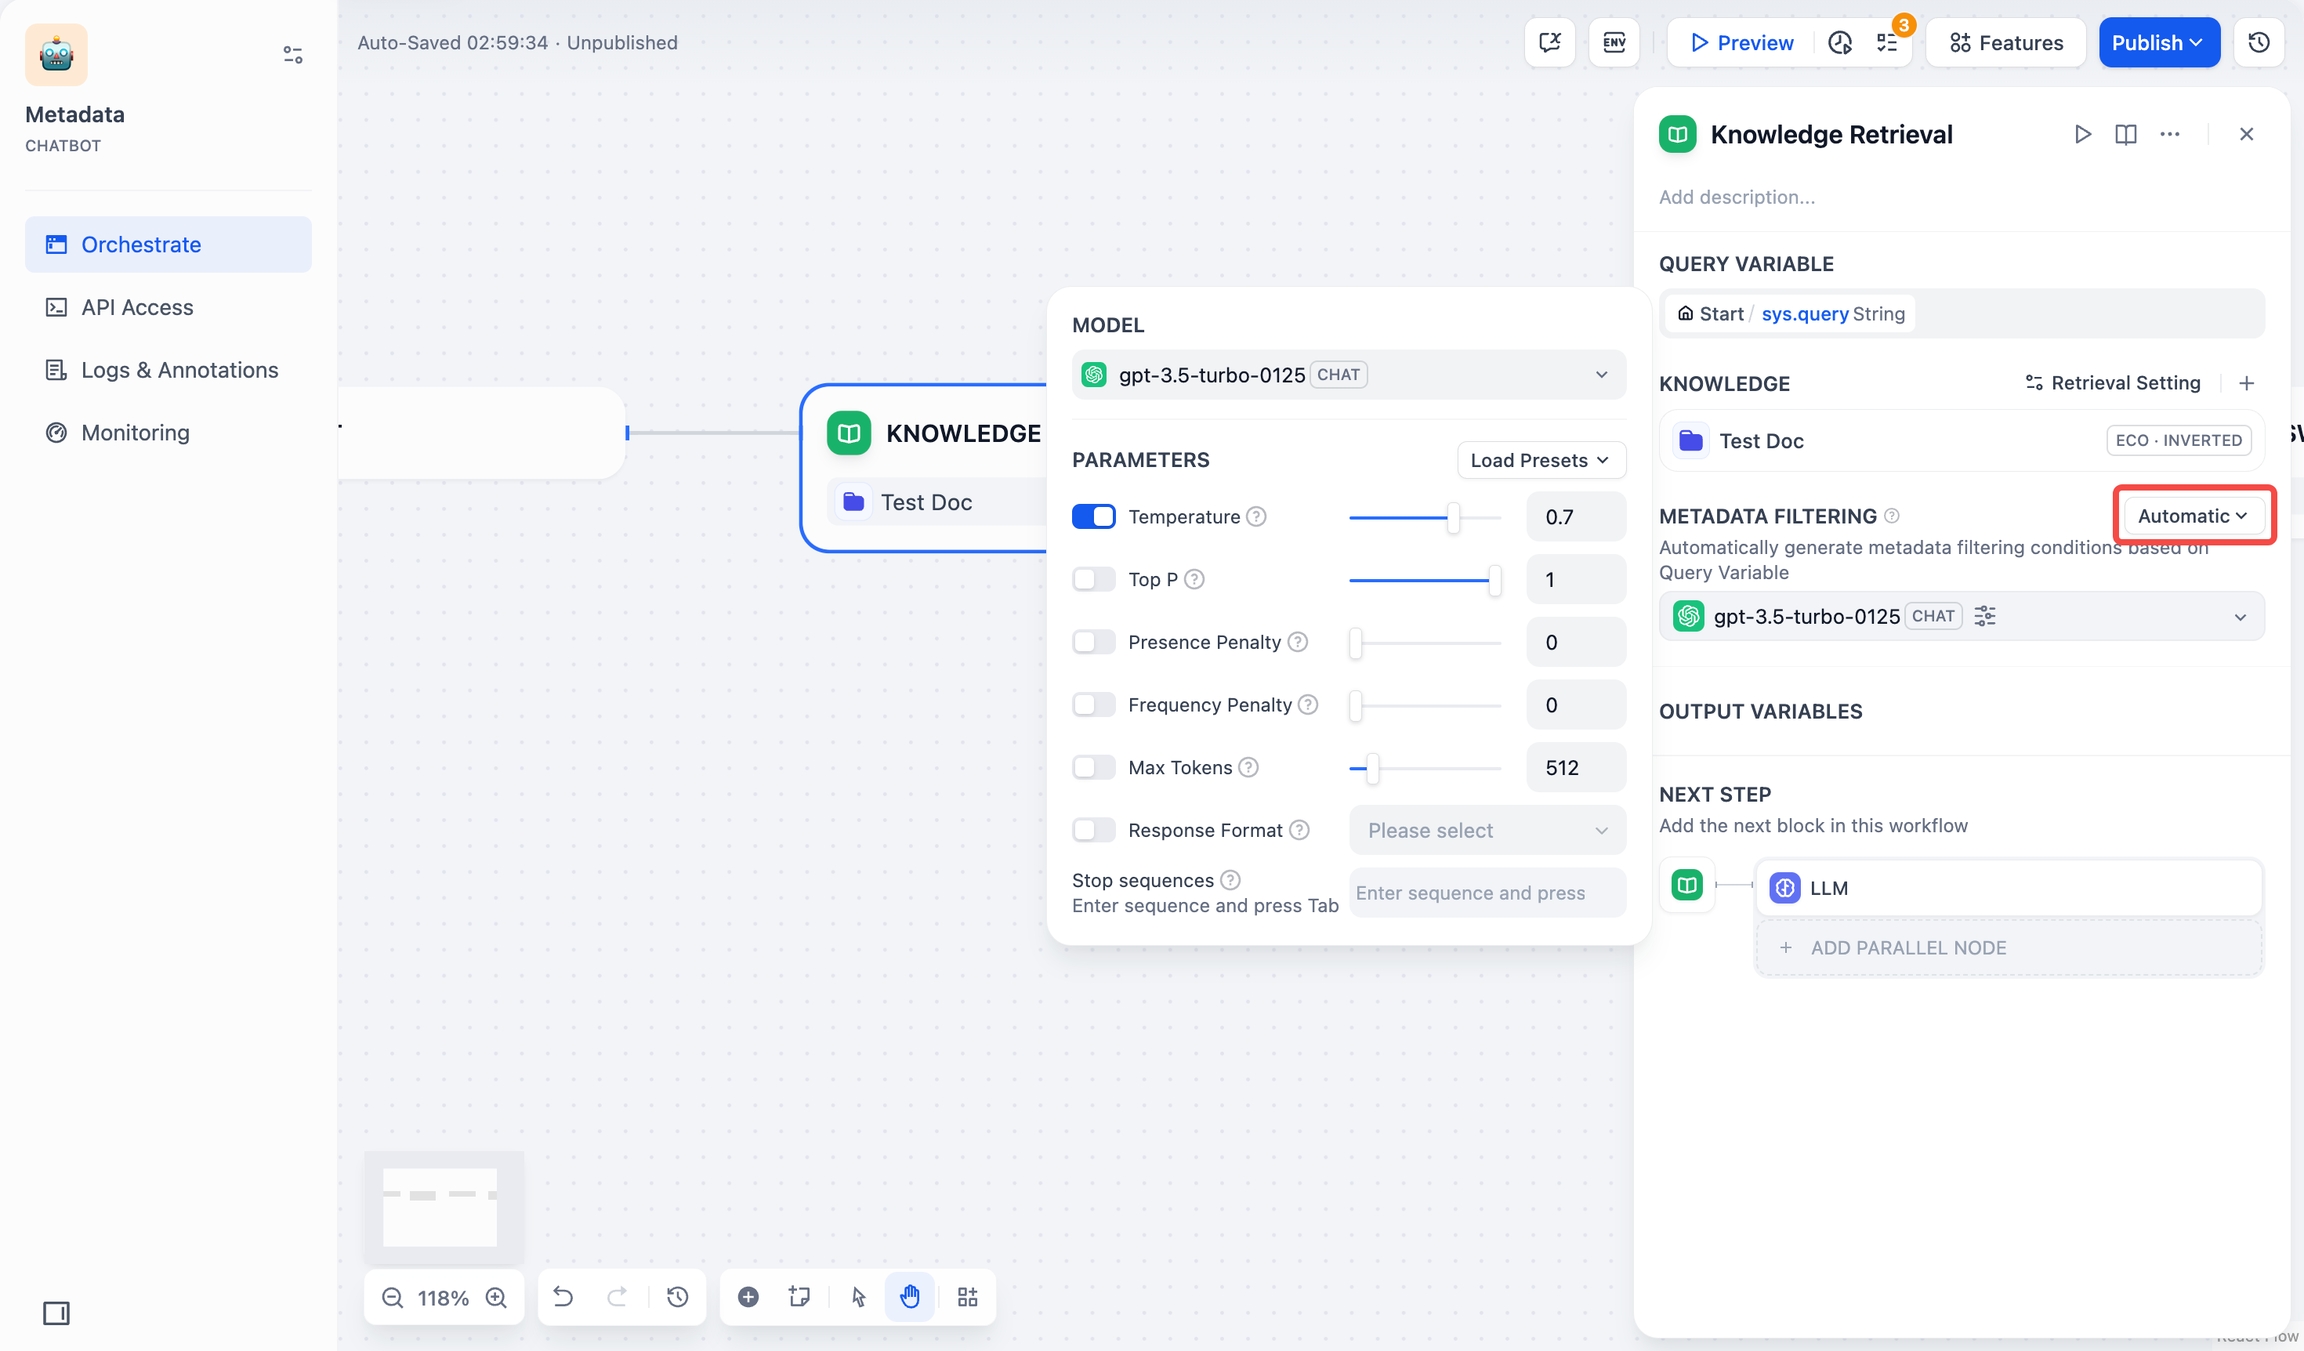
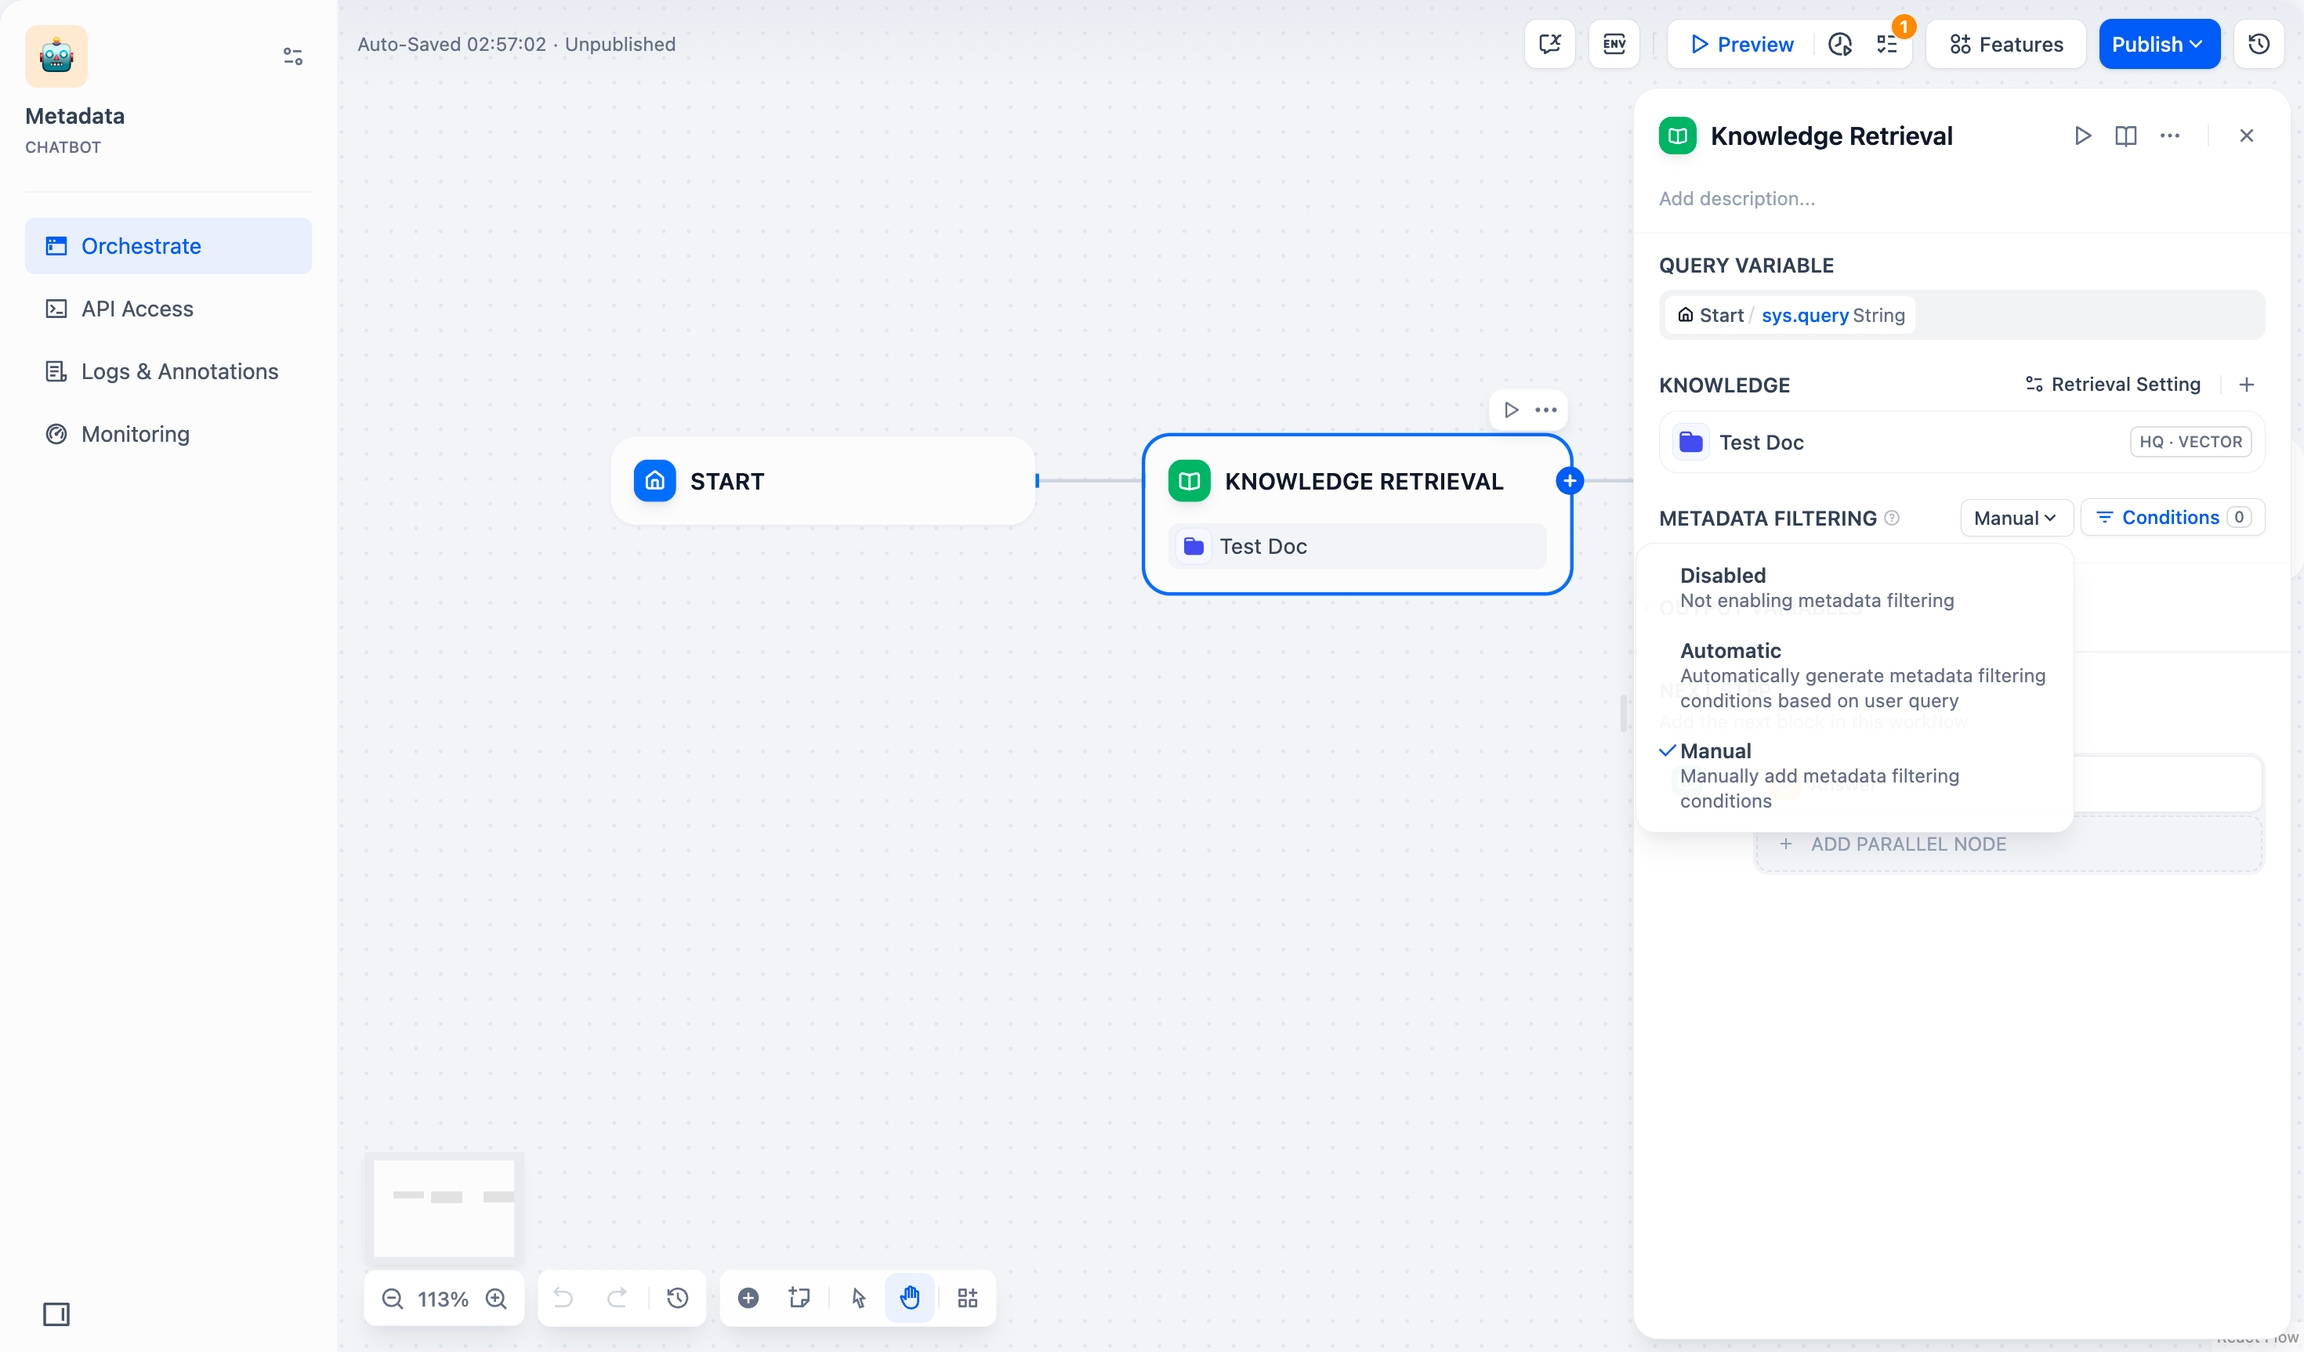
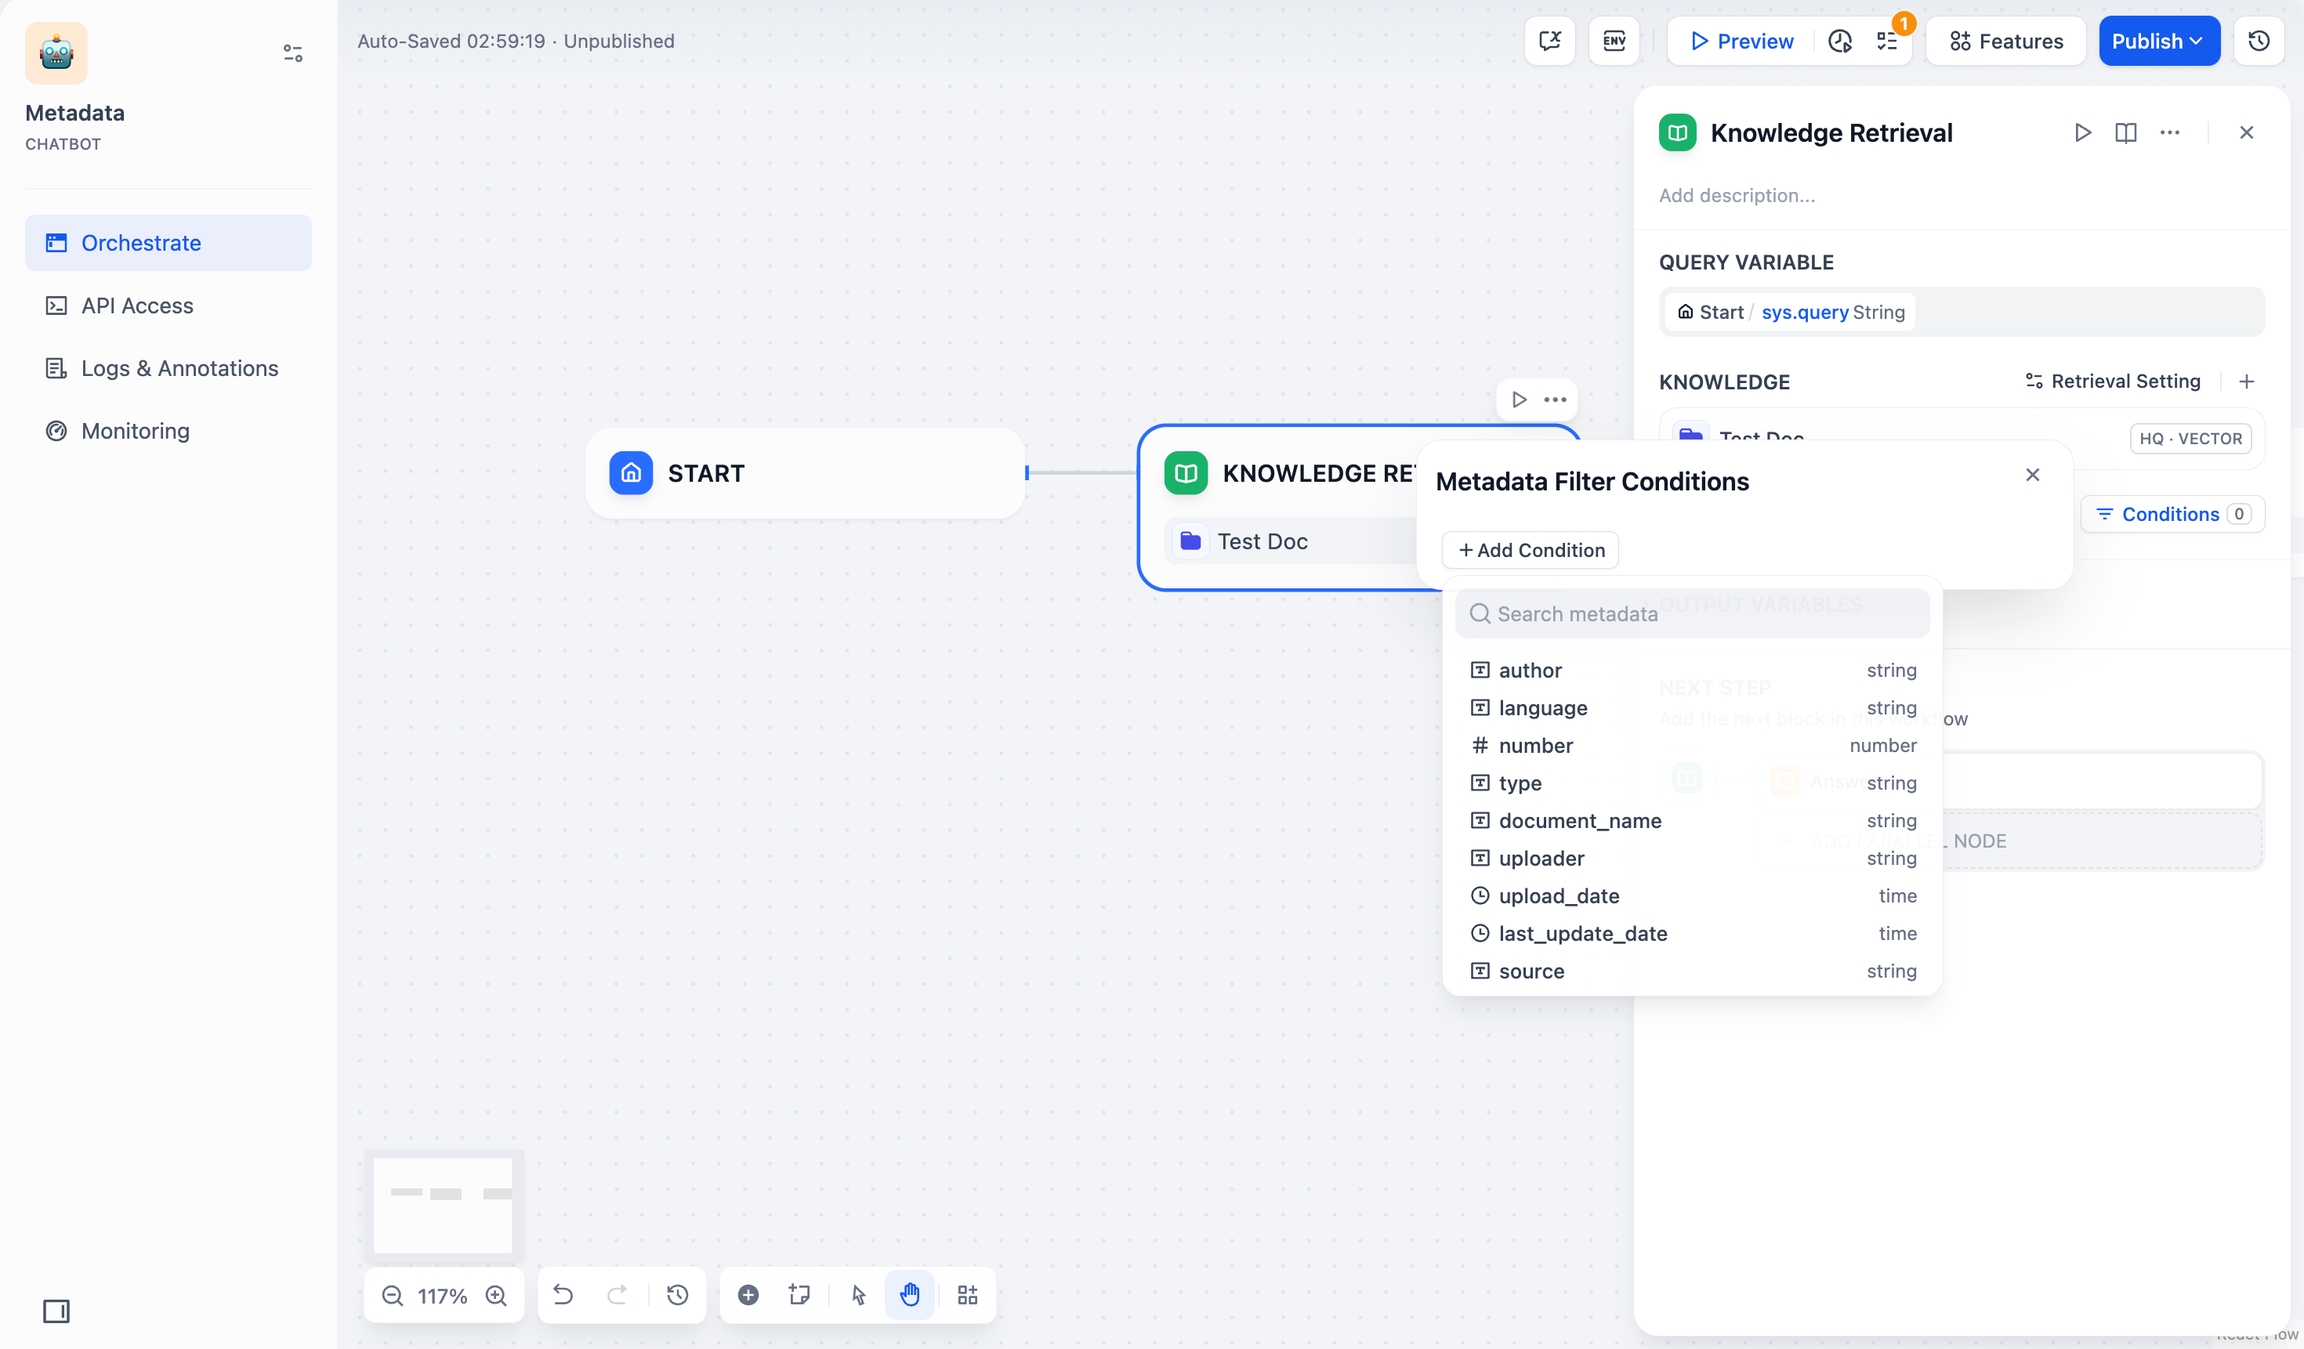
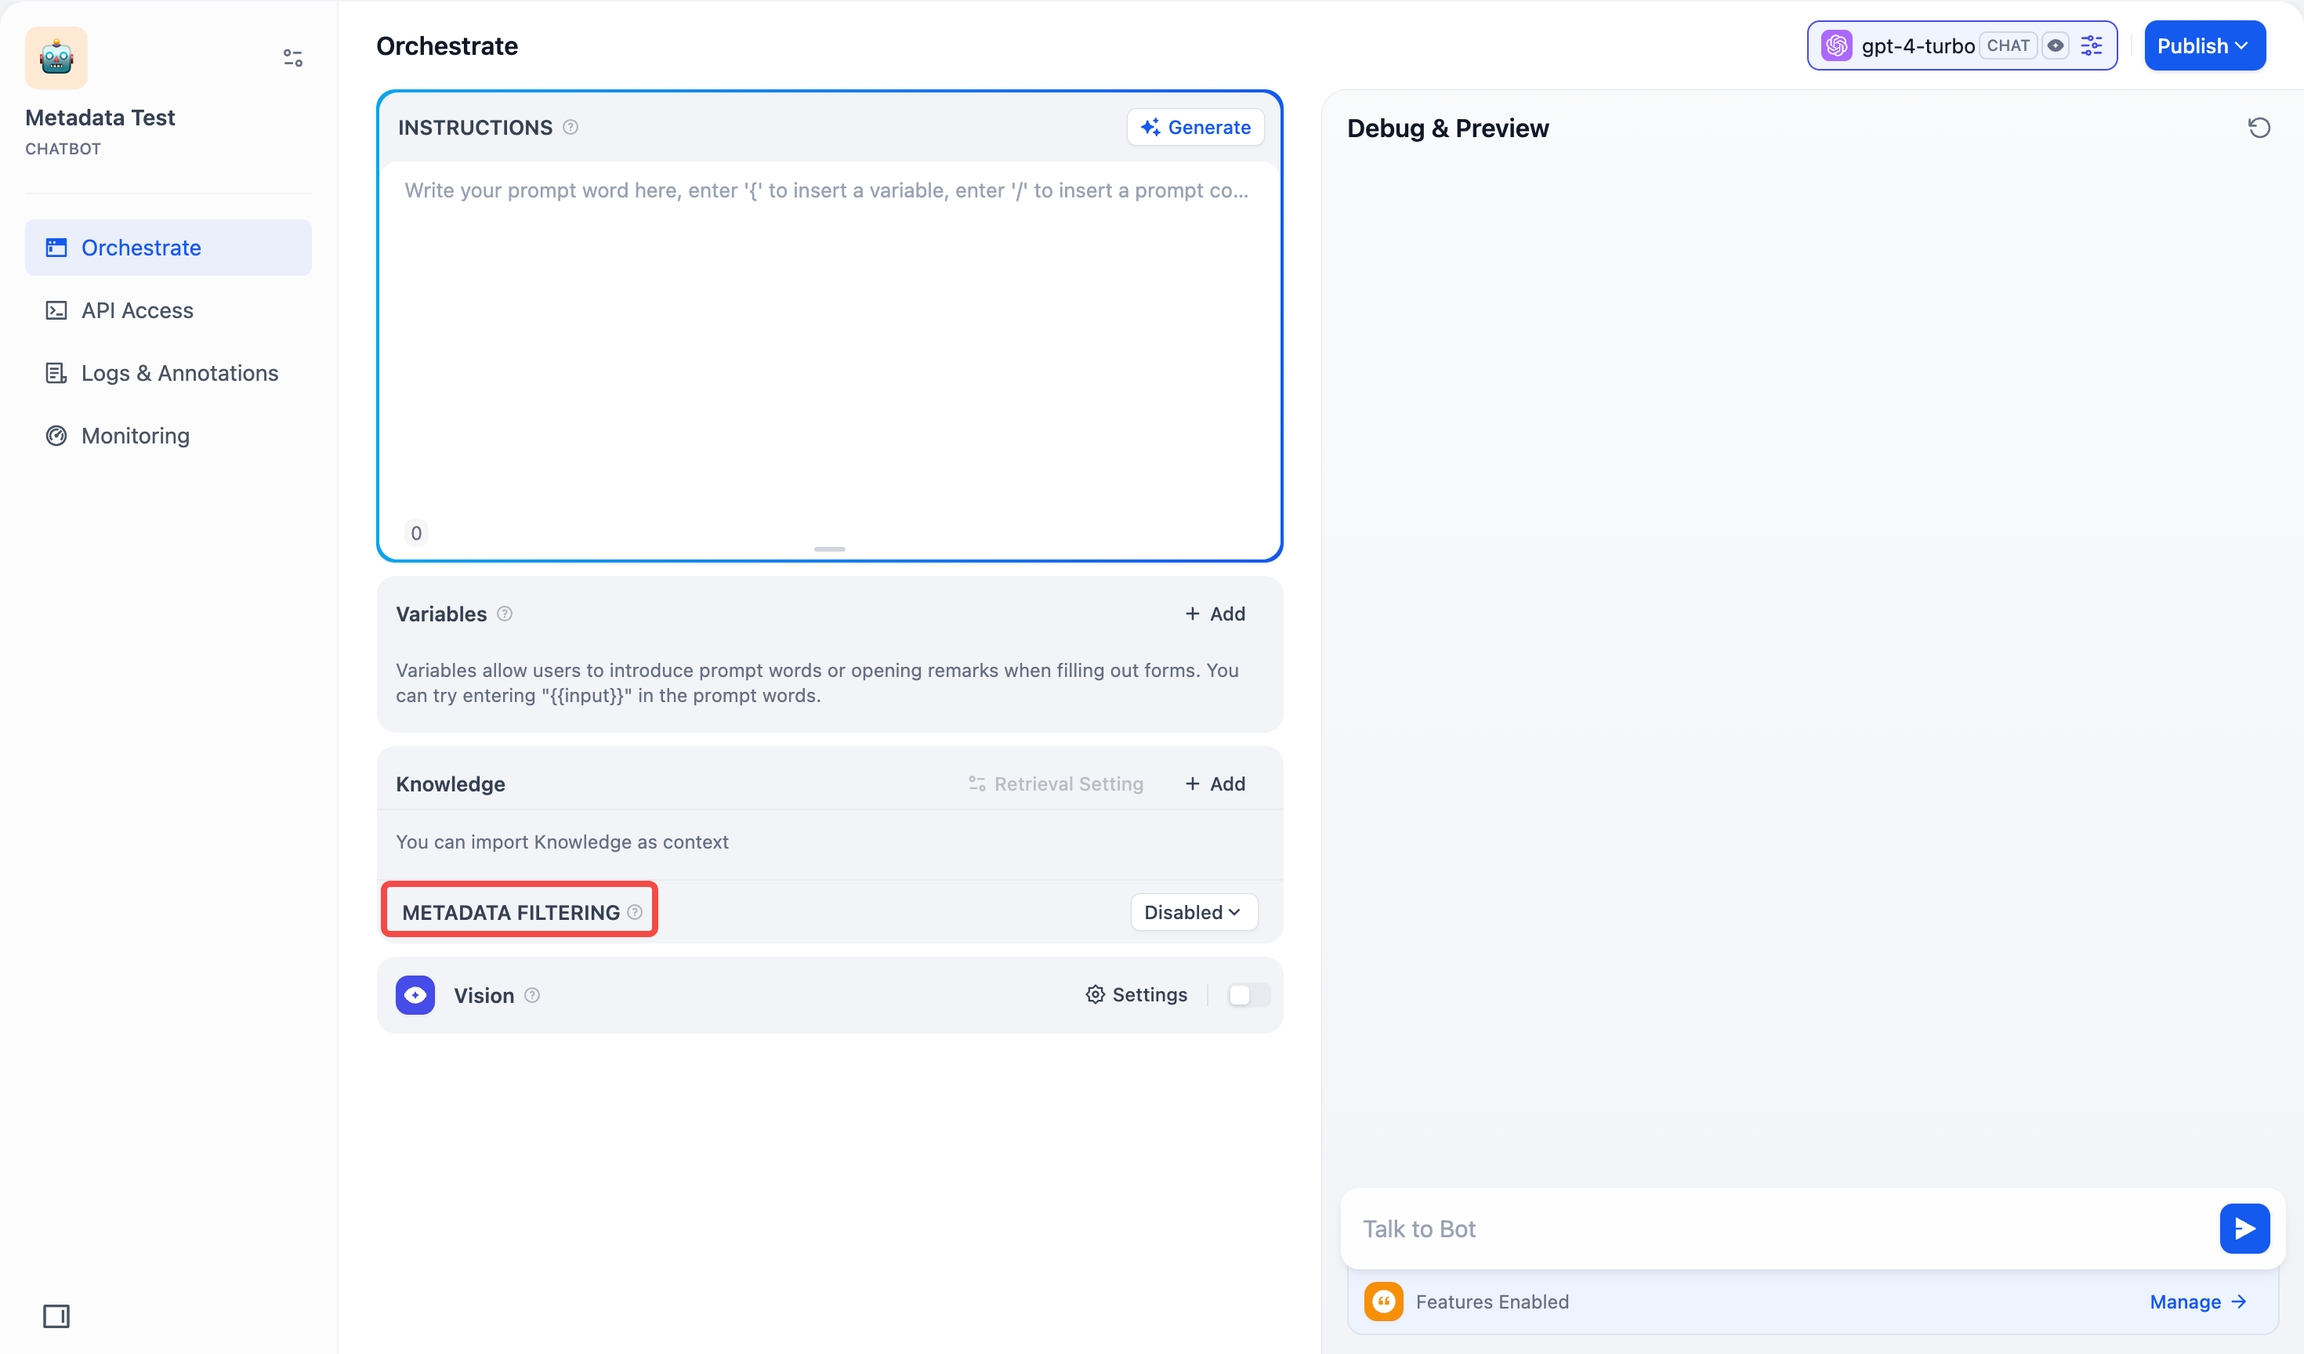
Metadata Filtering
Chatflow/Workflow
The Knowledge Retrieval node allows you to filter documents using metadata fields.
Steps
Select Filter Mode:
Disabled (Default): No metadata filtering.
Automatic: Filters auto-configure from query variables in the Knowledge Retrieval node.
Note: Automatic Mode requires model selection for document retrieval.
model_selection Manual: Configure filters manually.
For Manual Mode, follow these steps:
Click Conditions to open the configuration panel.
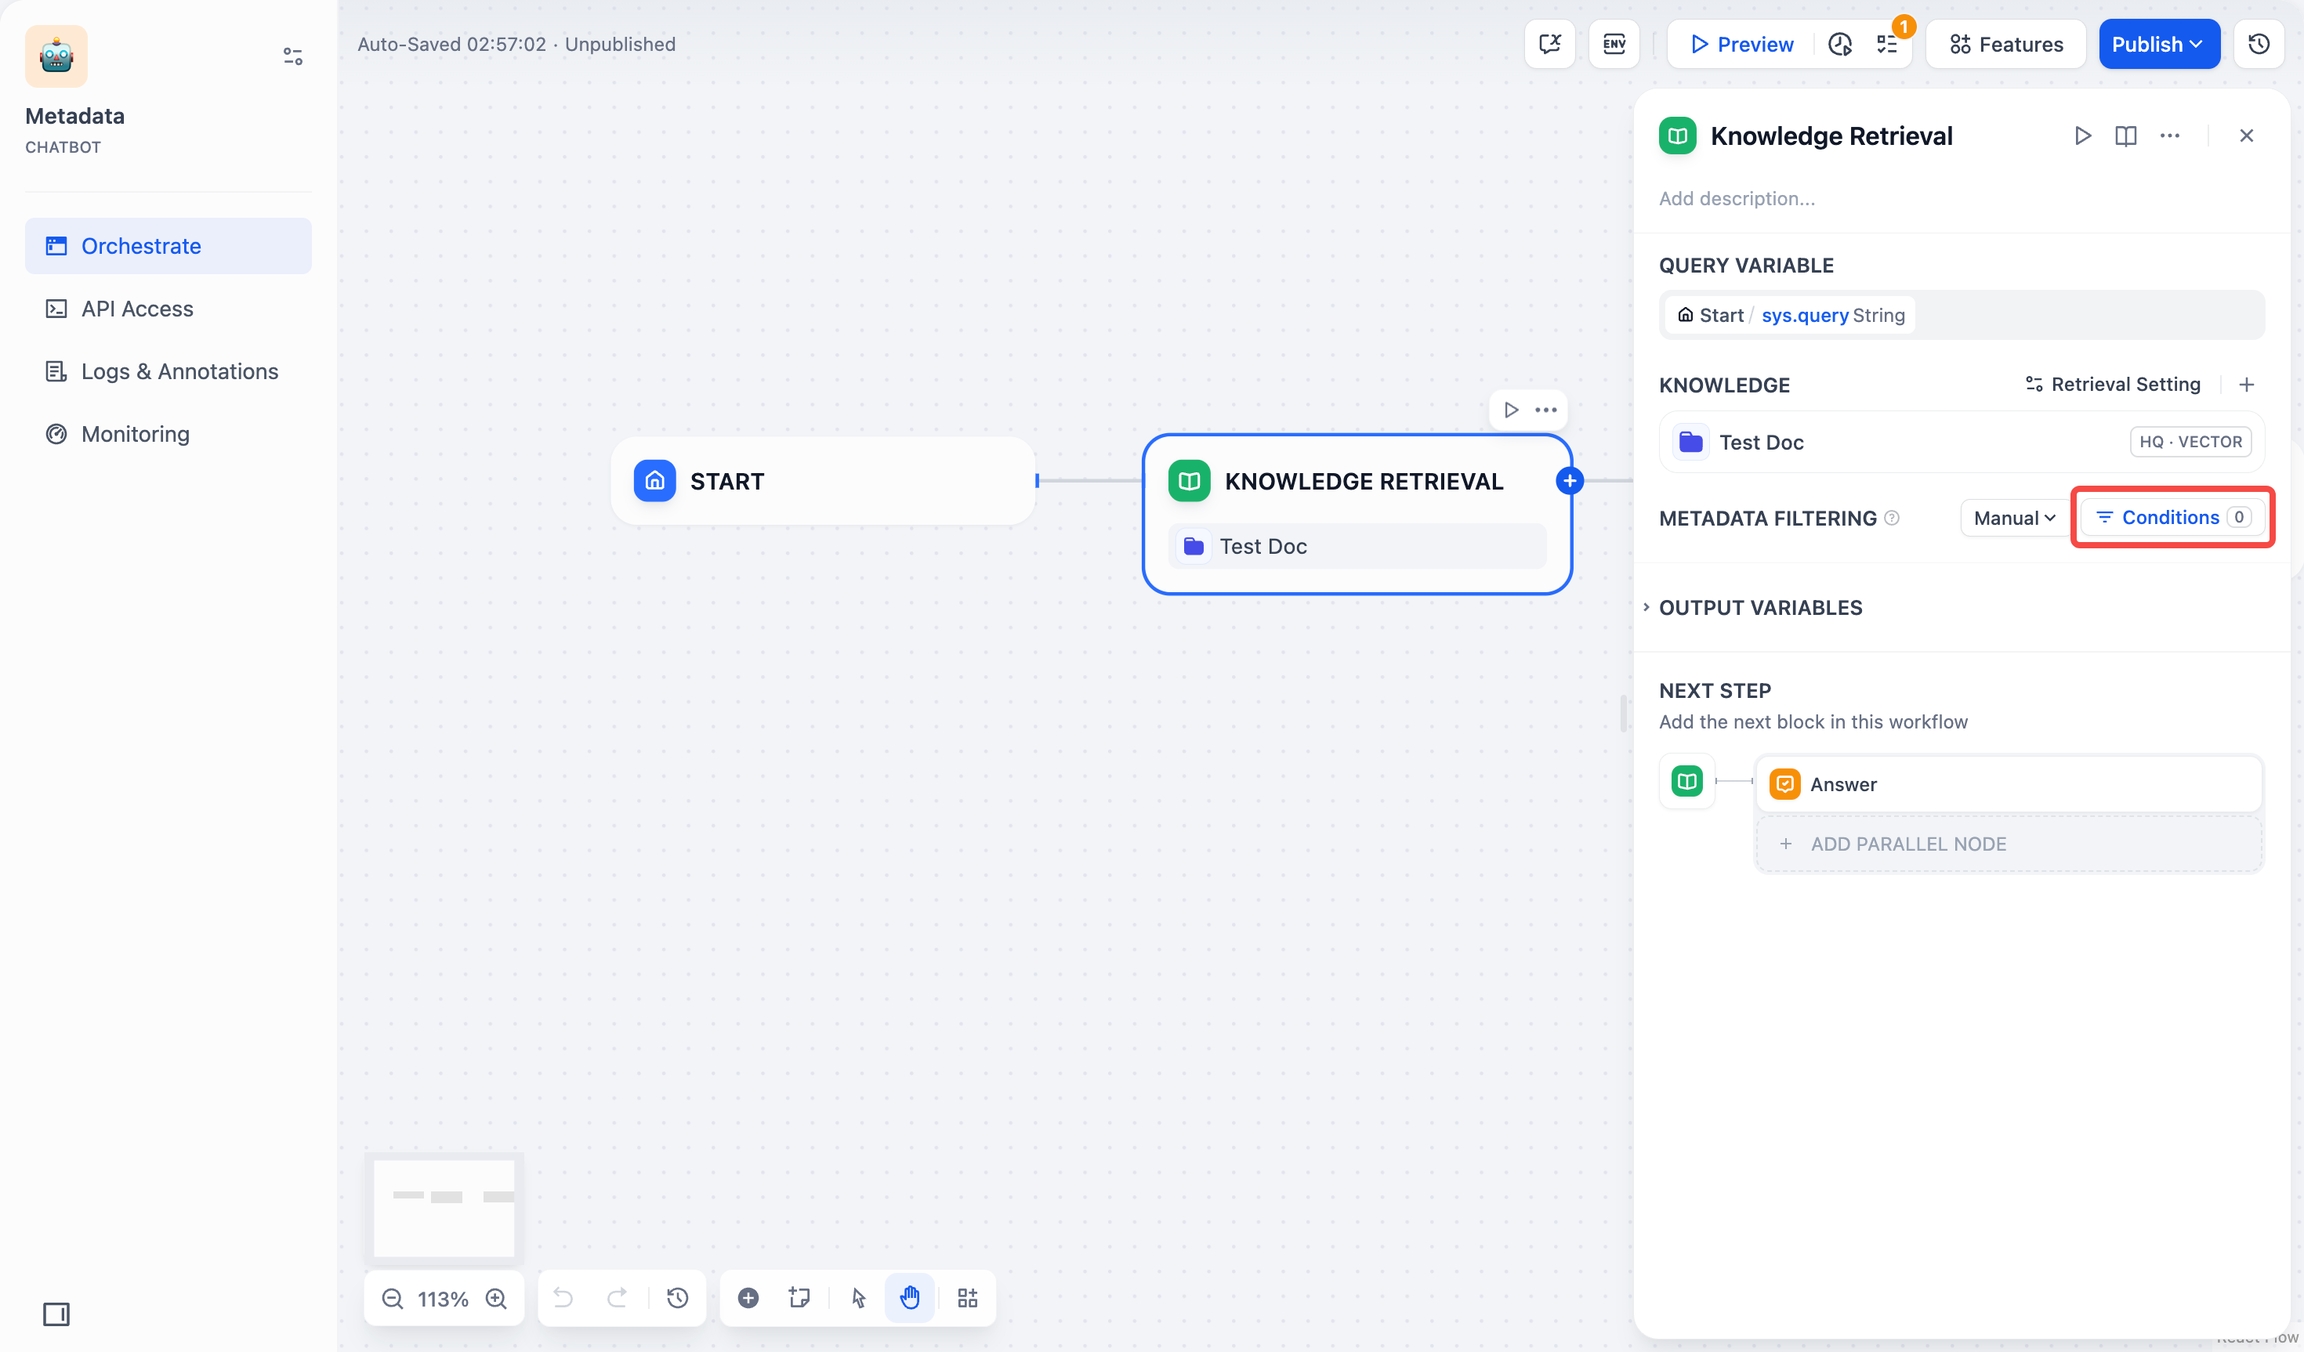
Conditions Click +Add Condition:
Select metadata fields within your chosen knowledge base from the dropdown list.
Note: When multiple knowledge bases are selected, only common metadata fields are shown in the list.
Use the search box to find specific fields.
Add Condition Click +Add Condition to add more fields.
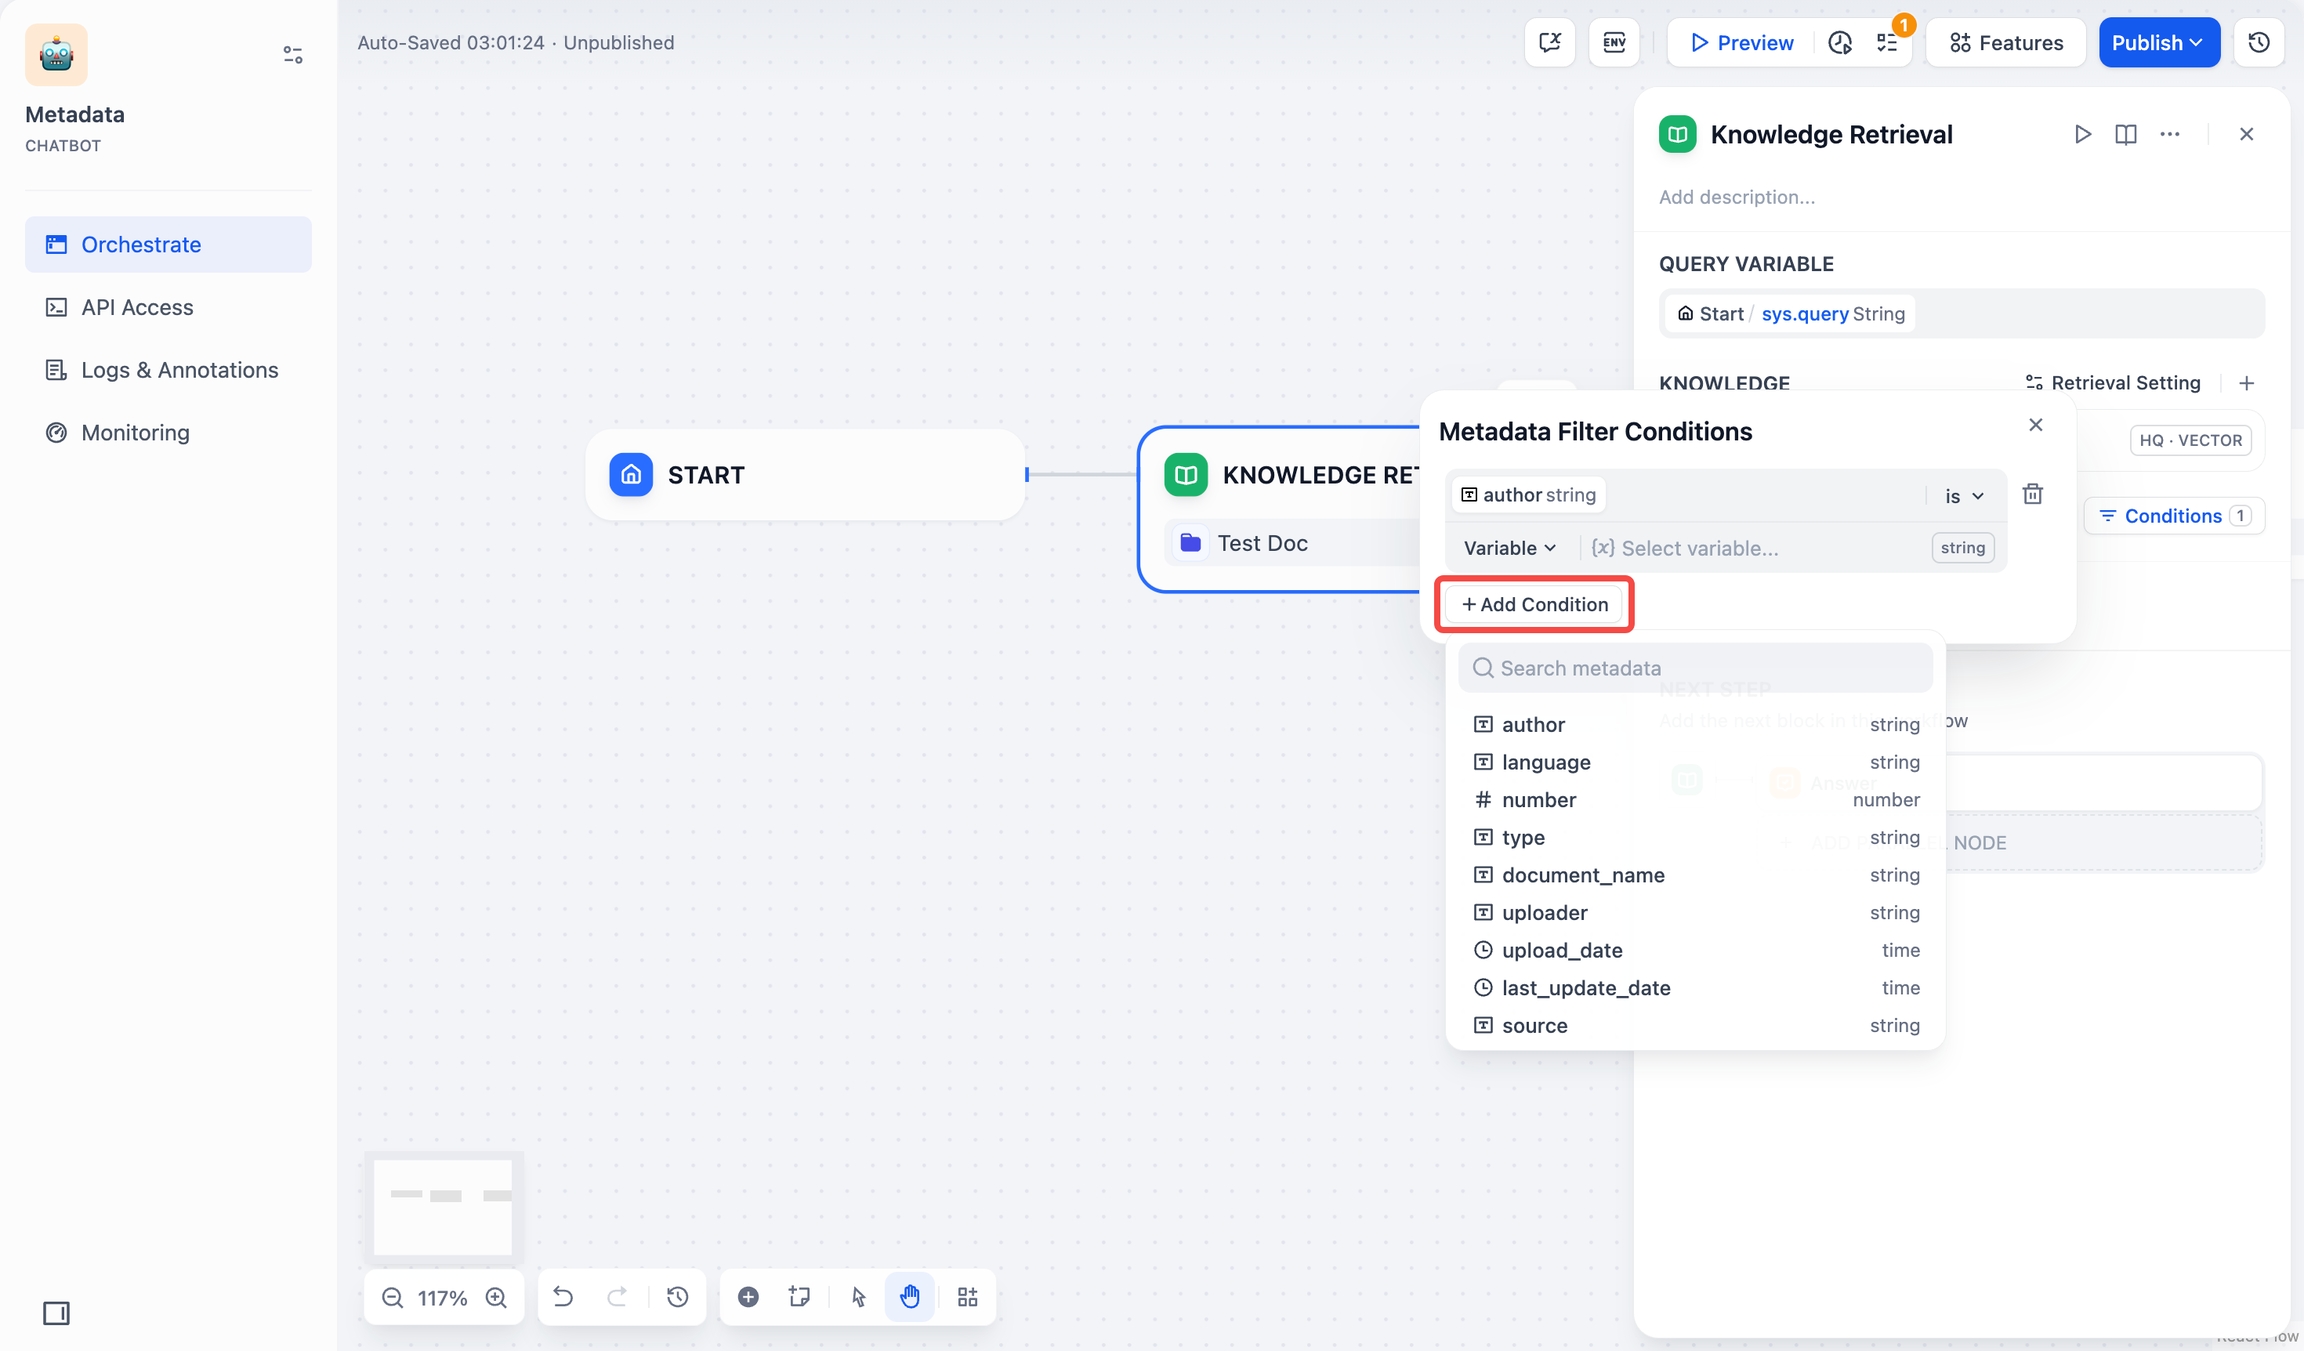
Add more fields Configure filter conditions:
Field TypeOperatorDescription and ExamplesString
is
Exact match required. Example:
is "Published"returns only documents marked exactly as “Published”.is not
Excludes exact matches. Example:
is not "Draft"returns all documents except those marked as “Draft”.is empty
Returns documents where the field has no value.
is not empty
Returns documents where the field has any value.
contains
Matches partial text. Example:
contains "Report"returns “Monthly Report”, “Annual Report”, etc.not contains
Excludes documents containing specified text. Example:
not contains "Draft"returns documents without “Draft” in the field.starts with
Matches text at beginning. Example:
starts with "Doc"returns “Doc1”, “Document”, etc.ends with
Matches text at end. Example:
ends with "2024"returns “Report 2024”, “Summary 2024”, etc.Number
=
Exact number match. Example:
= 10returns documents marked with exactly 10.≠
Excludes specific number. Example:
≠ 5returns all documents except those marked with 5.>
Greater than. Example:
> 100returns documents with values above 100.<
Less than. Example:
< 50returns documents with values below 50.≥
Greater than or equal to. Example:
≥ 20returns documents with values 20 or higher.≤
Less than or equal to. Example:
≤ 200returns documents with values 200 or lower.is empty
Field has no value assigned. For example,
is emptyreturns all documents where this field has no number assigned.is not empty
Field has a value assigned. For example,
is not emptyreturns all documents where this field has a number assigned.Date
is
Exact date match. Example:
is "2024-01-01"returns documents dated January 1, 2024.before
Prior to date. Example:
before "2024-01-01"returns documents dated before January 1, 2024.after
After date. Example:
after "2024-01-01"returns documents dated after January 1, 2024.is empty
Returns documents with no date value.
is not empty
Returns documents with any date value.
Add filter values:
Variable: Select from existing Chatflow/Workflow variables.

Variable Constant: Enter specific values.
Time-type fields can only be filtered by constants The date picker is for time-type fields.
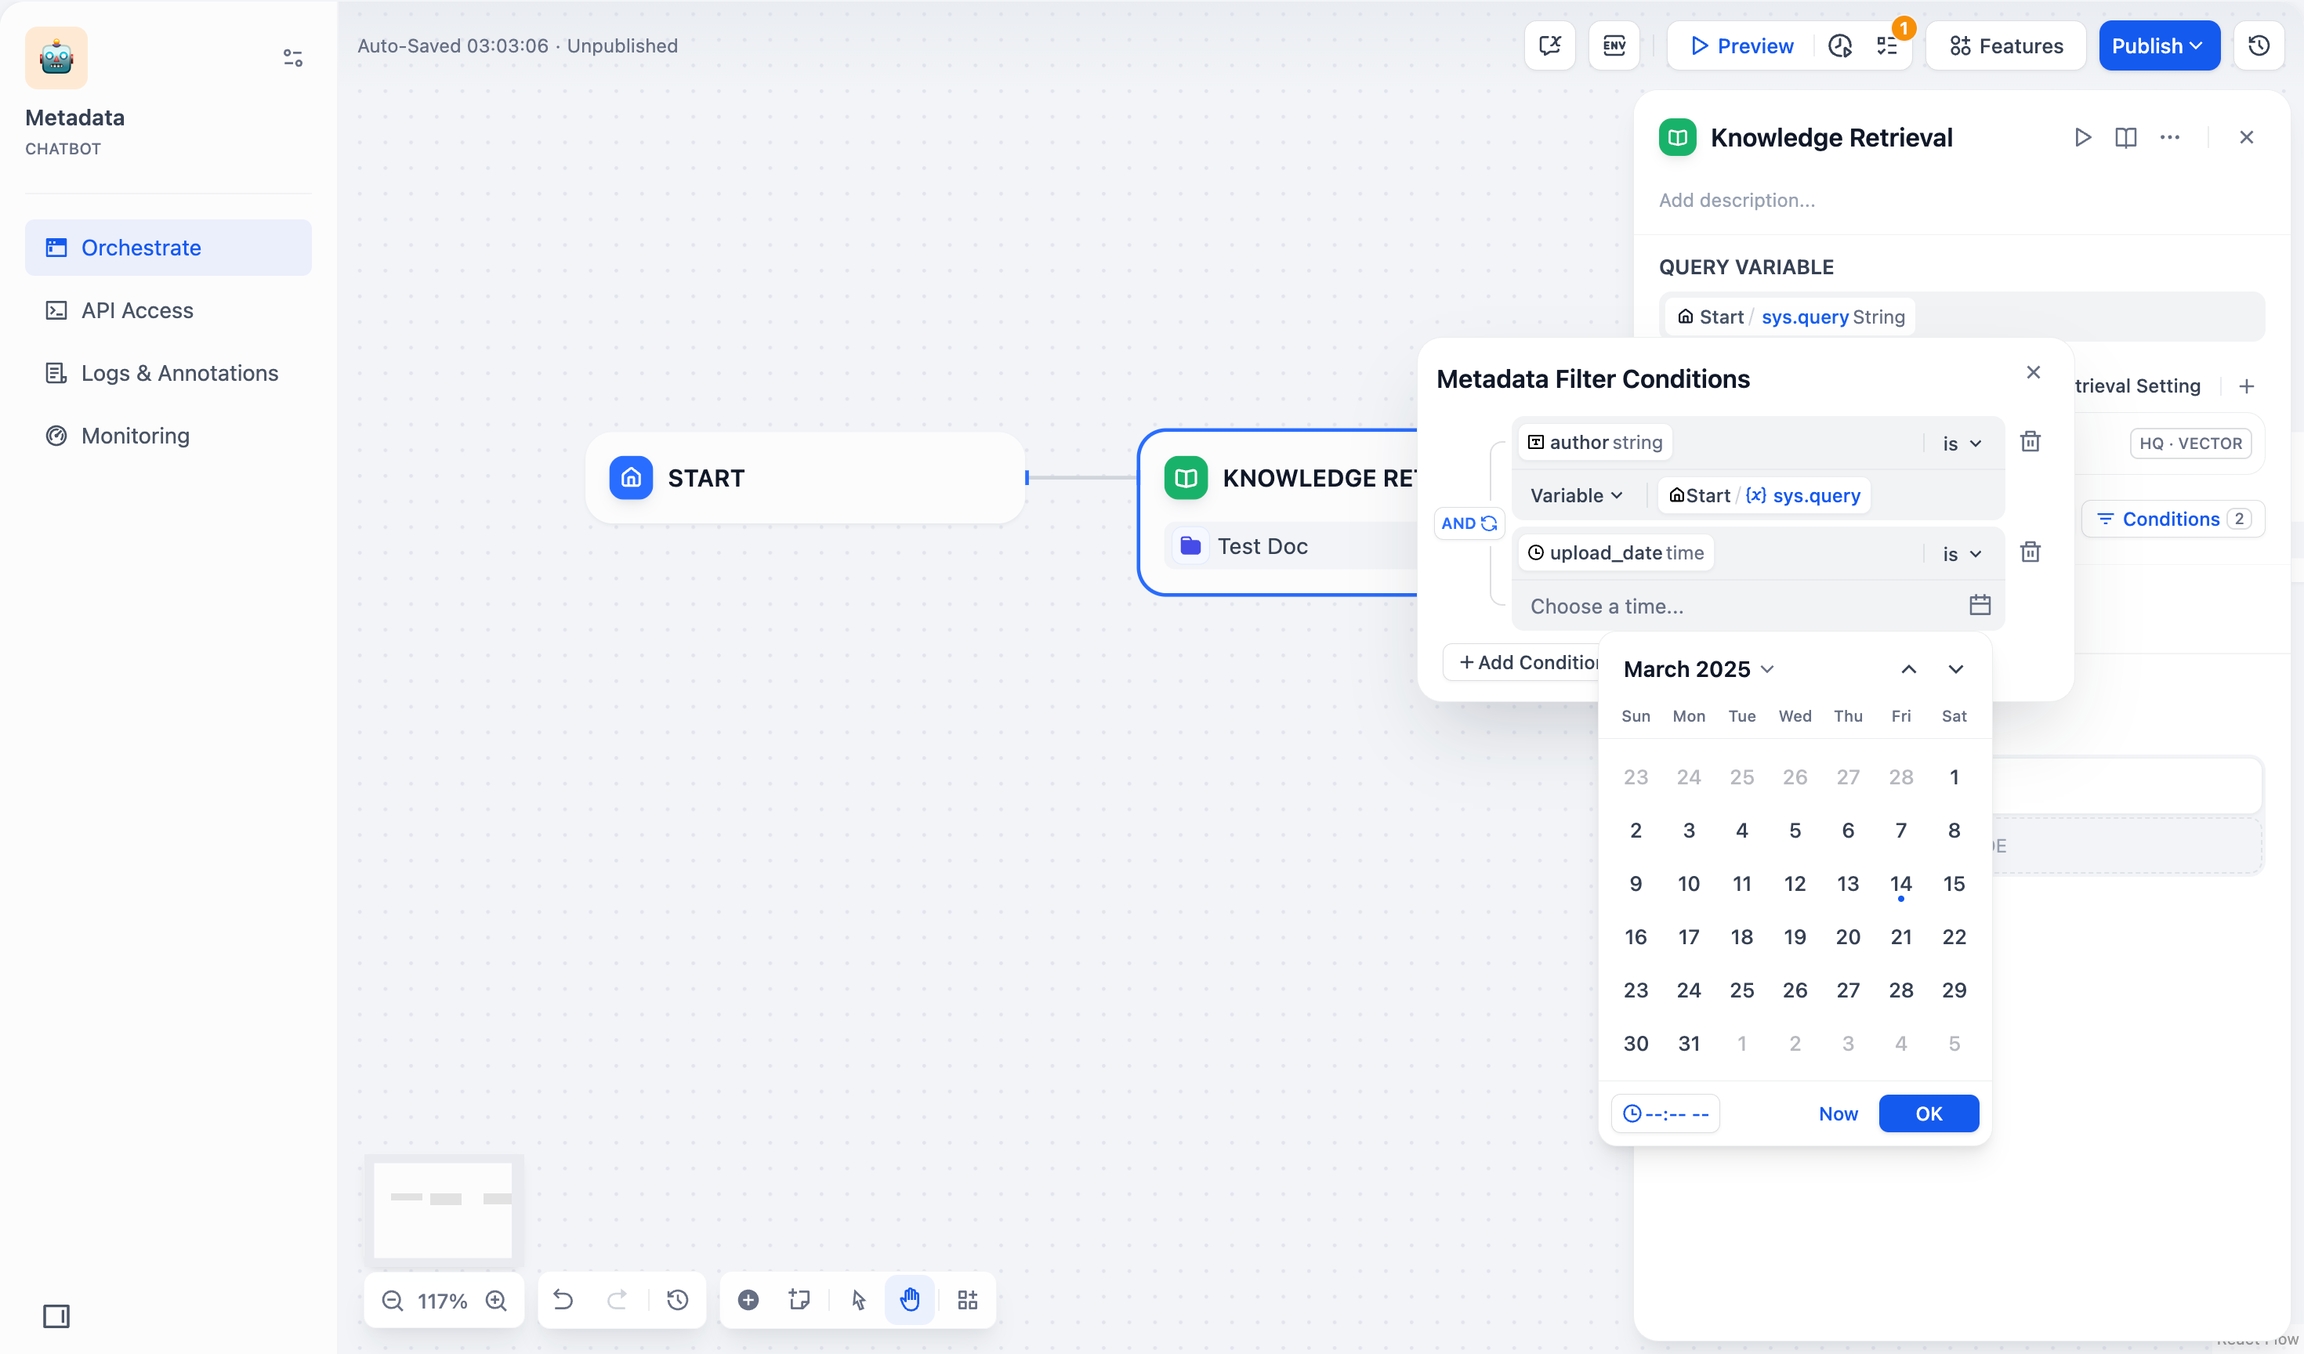
Date picker
Filter values are case-sensitive and require exact matches. Example: a filter
starts with “App”orcontains “App”will match “Apple” but not “apple” or “APPLE”.Set logic operators:
AND: Match all conditionsOR: Match any condition
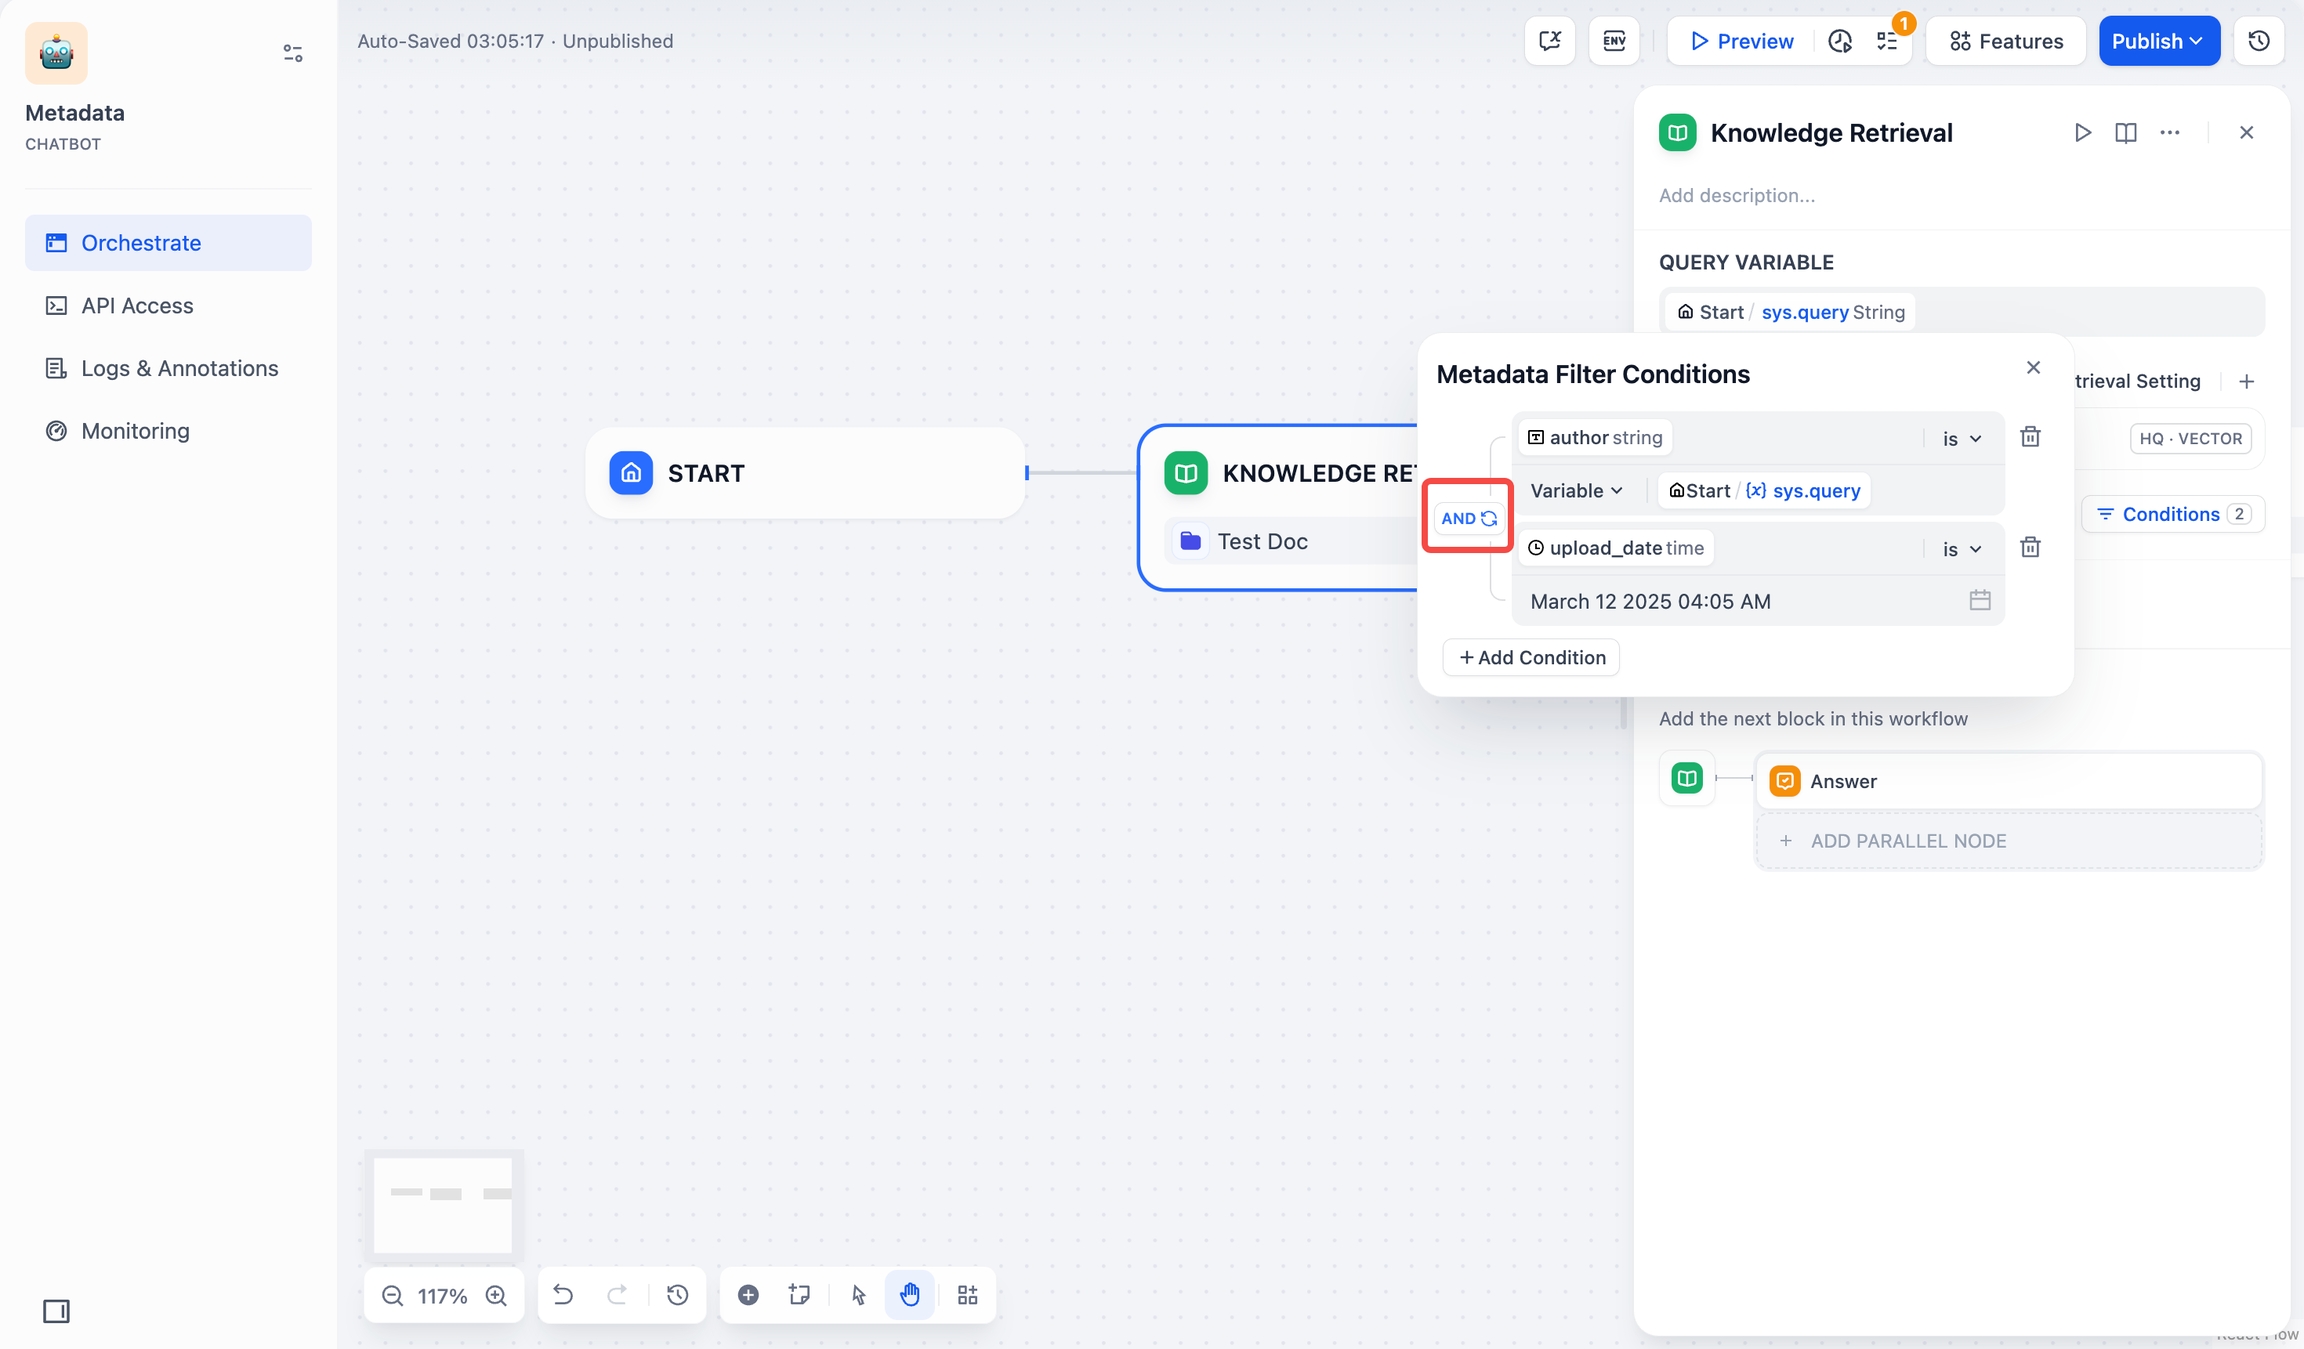
Logic Click outside the panel to save your settings.
Chatbot
Access Metadata Filtering below Knowledge (bottom-left). Configuration steps are the same as in Chatflow/Workflow.
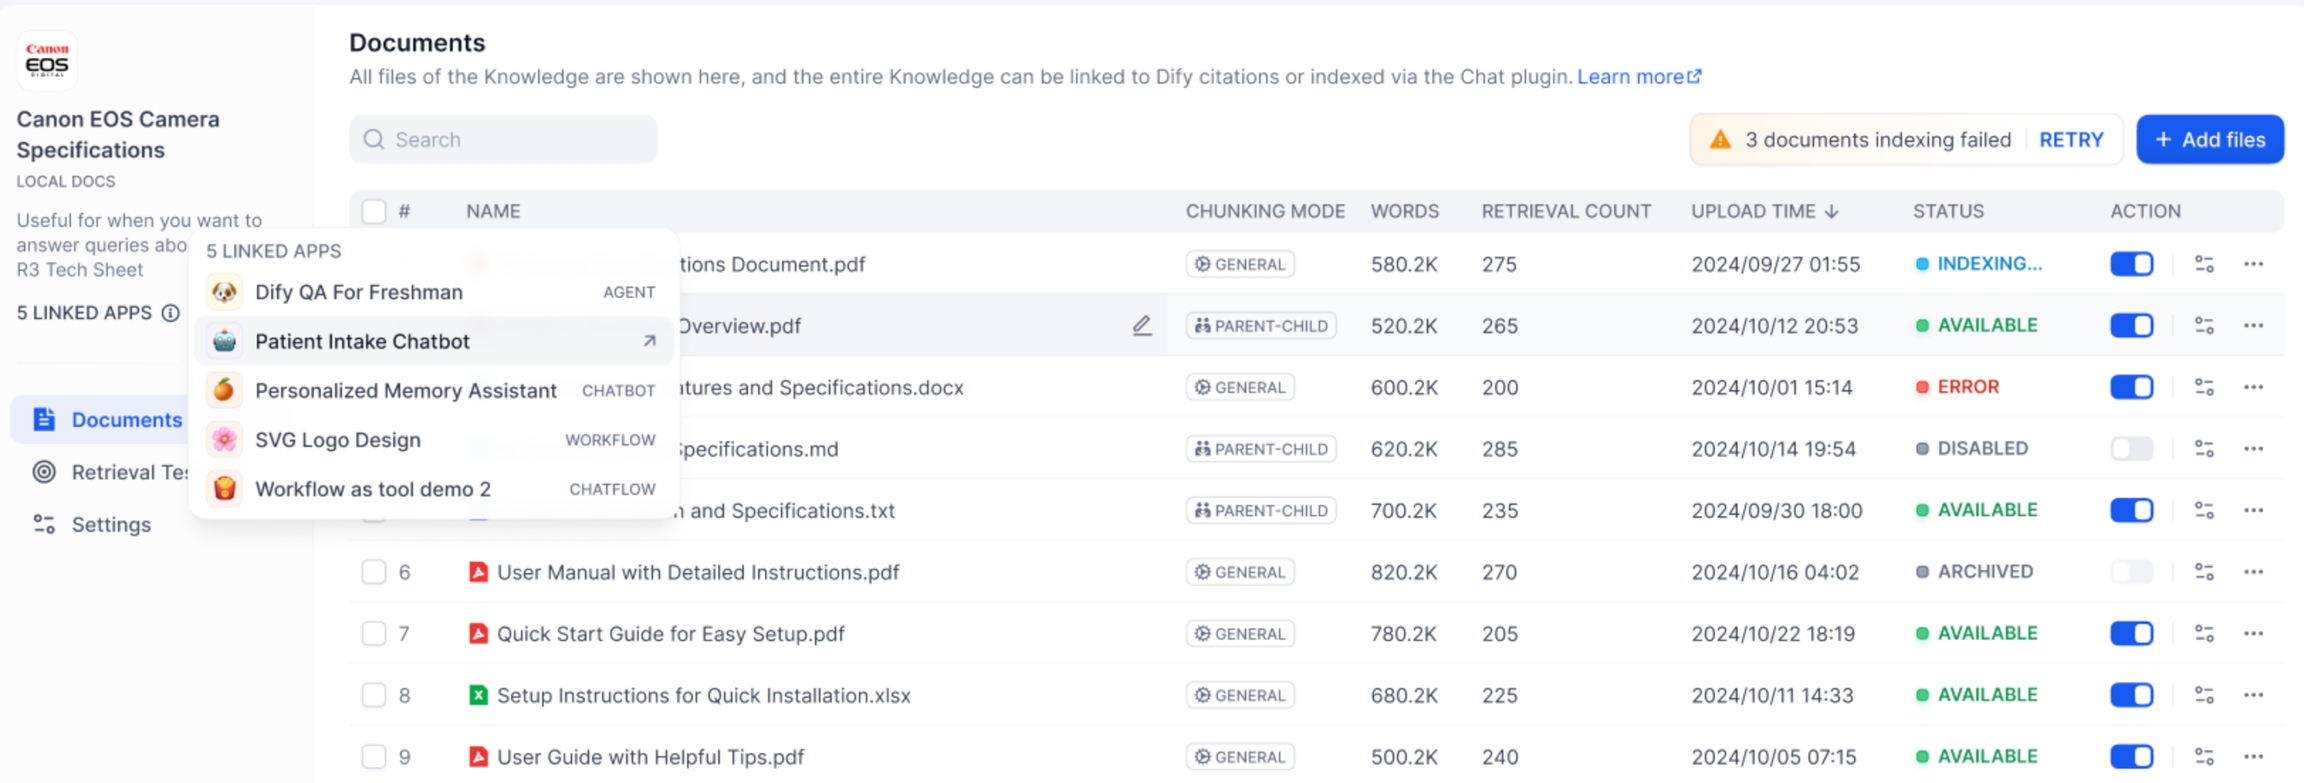
Chatbot View Linked Applications in the Knowledge BaseOn the left side of the knowledge base, you can see all linked Apps. Hover over the circular icon to view the list of all linked apps. Click the jump button on the right to quickly browser them.
Viewing the linked Apps Frequently Asked QuestionsHow should I choose Rerank settings in multi-recall mode?
If users know the exact information or terminology, you can use keyword search for precise matching. In that case, set “Keywords” to 1 under Weight Settings.
If the knowledge base doesn’t contain the exact terms or if a cross-lingual query is involved, we recommend setting “Semantic” to 1 under Weight Settings.
If you are familiar with real user queries and want to adjust the ratio of semantics to keywords, they can manually tweak the ratio under Weight Settings.
If the knowledge base is complex, making simple semantic or keyword matches insufficient—and you need highly accurate answers and are willing to pay more—consider using a Rerank Model for content retrieval.
What should I do if I encounter issues finding the “Weight Score” or the requirement to configure a Rerank model?
Here's how the knowledge base retrieval method affects Multi-path Retrieval:

What should I do if I cannot adjust the “Weight Score” when referencing multiple knowledge bases and an error message appears?
This issue occurs because the embedding models used in the multiple referenced knowledge bases are inconsistent, prompting this notification to avoid conflicts in retrieval content. It is advisable to set and enable the Rerank model in the "Model Provider" or unify the retrieval settings of the knowledge bases.
Why can't I find the “Weight Score” option in multi-recall mode, and only see the Rerank model?
Please check whether your knowledge base is using the “Economical” index mode. If so, switch it to the “High Quality” index mode.
Last updated