# Quick Tool Integration
{% hint style="warning" %}
"Tools" has been fully upgraded to the "Plugins". For more details, please refer to [Develop Plugins](https://docs.dify.ai/plugins/quick-start/develop-plugins). The content below has been archived.
{% endhint %}
Here, we will use GoogleSearch as an example to demonstrate how to quickly integrate a tool.
### 1. Prepare the Tool Provider yaml
#### Introduction
This yaml declares a new tool provider, and includes information like the provider's name, icon, author, and other details that are fetched by the frontend for display.
#### Example
We need to create a `google` module (folder) under `core/tools/provider/builtin`, and create `google.yaml`. The name must be consistent with the module name.
Subsequently, all operations related to this tool will be carried out under this module.
```yaml
identity: # Basic information of the tool provider
author: Dify # Author
name: google # Name, unique, no duplication with other providers
label: # Label for frontend display
en_US: Google # English label
zh_Hans: Google # Chinese label
ja_JP: Google # Japanese label
pt_BR: Google # Portuguese label
description: # Description for frontend display
en_US: Google # English description
zh_Hans: Google # Chinese description
ja_JP: Google # Japanese description
pt_BR: Google # Portuguese description
icon: icon.svg # Icon, needs to be placed in the _assets folder of the current module
```
* The `identity` field is mandatory, it contains the basic information of the tool provider, including author, name, label, description, icon, etc.
* The icon needs to be placed in the `_assets` folder of the current module, you can refer to: api/core/tools/provider/builtin/google/\_assets/icon.svg
```xml
```
### 2. Prepare Provider Credentials
Google, as a third-party tool, uses the API provided by SerpApi, which requires an API Key to use. This means that this tool needs a credential to use. For tools like `wikipedia`, there is no need to fill in the credential field, you can refer to: api/core/tools/provider/builtin/wikipedia/wikipedia.yaml
```yaml
identity:
author: Dify
name: wikipedia
label:
en_US: Wikipedia
zh_Hans: 维基百科
ja_JP: Wikipedia
pt_BR: Wikipedia
description:
en_US: Wikipedia is a free online encyclopedia, created and edited by volunteers around the world.
zh_Hans: 维基百科是一个由全世界的志愿者创建和编辑的免费在线百科全书。
ja_JP: Wikipediaは、世界中のボランティアによって作成、編集されている無料のオンライン百科事典です。
pt_BR: A Wikipédia é uma enciclopédia online gratuita, criada e editada por voluntários ao redor do mundo.
icon: icon.svg
credentials_for_provider:
```
After configuring the credential field, the effect is as follows:
```yaml
identity:
author: Dify
name: google
label:
en_US: Google
zh_Hans: Google
ja_JP: Google
pt_BR: Google
description:
en_US: Google
zh_Hans: Google
ja_JP: Google
pt_BR: Google
icon: icon.svg
credentials_for_provider: # Credential field
serpapi_api_key: # Credential field name
type: secret-input # Credential field type
required: true # Required or not
label: # Credential field label
en_US: SerpApi API key # English label
zh_Hans: SerpApi API key # Chinese label
ja_JP: SerpApi API key # Japanese label
pt_BR: chave de API SerpApi # Portuguese label
placeholder: # Credential field placeholder
en_US: Please input your SerpApi API key # English placeholder
zh_Hans: 请输入你的 SerpApi API key # Chinese placeholder
ja_JP: SerpApi API keyを入力してください # Japanese placeholder
pt_BR: Por favor, insira sua chave de API SerpApi # Portuguese placeholder
help: # Credential field help text
en_US: Get your SerpApi API key from SerpApi # English help text
zh_Hans: 从 SerpApi 获取你的 SerpApi API key # Chinese help text
ja_JP: SerpApiからSerpApi APIキーを取得する # Japanese help text
pt_BR: Obtenha sua chave de API SerpApi da SerpApi # Portuguese help text
url: https://serpapi.com/manage-api-key # Credential field help link
```
* `type`: Credential field type, currently can be either `secret-input`, `text-input`, or `select` , corresponding to password input box, text input box, and drop-down box, respectively. If set to `secret-input`, it will mask the input content on the frontend, and the backend will encrypt the input content.
### 3. Prepare Tool yaml
A provider can have multiple tools, each tool needs a yaml file to describe, this file contains the basic information, parameters, output, etc. of the tool.
Still taking GoogleSearch as an example, we need to create a `tools` module under the `google` module, and create `tools/google_search.yaml`, the content is as follows.
```yaml
identity: # Basic information of the tool
name: google_search # Tool name, unique, no duplication with other tools
author: Dify # Author
label: # Label for frontend display
en_US: GoogleSearch # English label
zh_Hans: 谷歌搜索 # Chinese label
ja_JP: Google検索 # Japanese label
pt_BR: Pesquisa Google # Portuguese label
description: # Description for frontend display
human: # Introduction for frontend display, supports multiple languages
en_US: A tool for performing a Google SERP search and extracting snippets and webpages.Input should be a search query.
zh_Hans: 一个用于执行 Google SERP 搜索并提取片段和网页的工具。输入应该是一个搜索查询。
ja_JP: Google SERP 検索を実行し、スニペットと Web ページを抽出するためのツール。入力は検索クエリである必要があります。
pt_BR: Uma ferramenta para realizar pesquisas no Google SERP e extrair snippets e páginas da web. A entrada deve ser uma consulta de pesquisa.
llm: A tool for performing a Google SERP search and extracting snippets and webpages.Input should be a search query. # Introduction passed to LLM, in order to make LLM better understand this tool, we suggest to write as detailed information about this tool as possible here, so that LLM can understand and use this tool
parameters: # Parameter list
- name: query # Parameter name
type: string # Parameter type
required: true # Required or not
label: # Parameter label
en_US: Query string # English label
zh_Hans: 查询语句 # Chinese label
ja_JP: クエリステートメント # Japanese label
pt_BR: Declaração de consulta # Portuguese label
human_description: # Introduction for frontend display, supports multiple languages
en_US: used for searching
zh_Hans: 用于搜索网页内容
ja_JP: ネットの検索に使用する
pt_BR: usado para pesquisar
llm_description: key words for searching # Introduction passed to LLM, similarly, in order to make LLM better understand this parameter, we suggest to write as detailed information about this parameter as possible here, so that LLM can understand this parameter
form: llm # Form type, llm means this parameter needs to be inferred by Agent, the frontend will not display this parameter
- name: result_type
type: select # Parameter type
required: true
options: # Drop-down box options
- value: text
label:
en_US: text
zh_Hans: 文本
ja_JP: テキスト
pt_BR: texto
- value: link
label:
en_US: link
zh_Hans: 链接
ja_JP: リンク
pt_BR: link
default: link
label:
en_US: Result type
zh_Hans: 结果类型
ja_JP: 結果タイプ
pt_BR: tipo de resultado
human_description:
en_US: used for selecting the result type, text or link
zh_Hans: 用于选择结果类型,使用文本还是链接进行展示
ja_JP: 結果の種類、テキスト、リンクを選択するために使用されます
pt_BR: usado para selecionar o tipo de resultado, texto ou link
form: form # Form type, form means this parameter needs to be filled in by the user on the frontend before the conversation starts
```
* The `identity` field is mandatory, it contains the basic information of the tool, including name, author, label, description, etc.
* `parameters` Parameter list
* `name` Parameter name, unique, no duplication with other parameters
* `type` Parameter type, currently supports `string`, `number`, `boolean`, `select` four types, corresponding to string, number, boolean, drop-down box
* `required` Required or not
* In `llm` mode, if the parameter is required, the Agent is required to infer this parameter
* In `form` mode, if the parameter is required, the user is required to fill in this parameter on the frontend before the conversation starts
* `options` Parameter options
* In `llm` mode, Dify will pass all options to LLM, LLM can infer based on these options
* In `form` mode, when `type` is `select`, the frontend will display these options
* `default` Default value
* `label` Parameter label, for frontend display
* `human_description` Introduction for frontend display, supports multiple languages
* `llm_description` Introduction passed to LLM, in order to make LLM better understand this parameter, we suggest to write as detailed information about this parameter as possible here, so that LLM can understand this parameter
* `form` Form type, currently supports `llm`, `form` two types, corresponding to Agent self-inference and frontend filling
### 4. Add Tool Logic
After completing the tool configuration, we can start writing the tool code that defines how it is invoked.
Create `google_search.py` under the `google/tools` module, the content is as follows.
```python
from core.tools.tool.builtin_tool import BuiltinTool
from core.tools.entities.tool_entities import ToolInvokeMessage
from typing import Any, Dict, List, Union
class GoogleSearchTool(BuiltinTool):
def _invoke(self,
user_id: str,
tool_parameters: Dict[str, Any],
) -> Union[ToolInvokeMessage, List[ToolInvokeMessage]]:
"""
invoke tools
"""
query = tool_parameters['query']
result_type = tool_parameters['result_type']
api_key = self.runtime.credentials['serpapi_api_key']
# TODO: search with serpapi
result = SerpAPI(api_key).run(query, result_type=result_type)
if result_type == 'text':
return self.create_text_message(text=result)
return self.create_link_message(link=result)
```
#### Parameters
The overall logic of the tool is in the `_invoke` method, this method accepts two parameters: `user_id` and `tool_parameters`, which represent the user ID and tool parameters respectively
#### Return Data
When the tool returns, you can choose to return one message or multiple messages, here we return one message, using `create_text_message` and `create_link_message` can create a text message or a link message.
### 5. Add Provider Code
Finally, we need to create a provider class under the provider module to implement the provider's credential verification logic. If the credential verification fails, it will throw a `ToolProviderCredentialValidationError` exception.
Create `google.py` under the `google` module, the content is as follows.
```python
from core.tools.entities.tool_entities import ToolInvokeMessage, ToolProviderType
from core.tools.tool.tool import Tool
from core.tools.provider.builtin_tool_provider import BuiltinToolProviderController
from core.tools.errors import ToolProviderCredentialValidationError
from core.tools.provider.builtin.google.tools.google_search import GoogleSearchTool
from typing import Any, Dict
class GoogleProvider(BuiltinToolProviderController):
def _validate_credentials(self, credentials: Dict[str, Any]) -> None:
try:
# 1. Here you need to instantiate a GoogleSearchTool with GoogleSearchTool(), it will automatically load the yaml configuration of GoogleSearchTool, but at this time it does not have credential information inside
# 2. Then you need to use the fork_tool_runtime method to pass the current credential information to GoogleSearchTool
# 3. Finally, invoke it, the parameters need to be passed according to the parameter rules configured in the yaml of GoogleSearchTool
GoogleSearchTool().fork_tool_runtime(
meta={
"credentials": credentials,
}
).invoke(
user_id='',
tool_parameters={
"query": "test",
"result_type": "link"
},
)
except Exception as e:
raise ToolProviderCredentialValidationError(str(e))
```
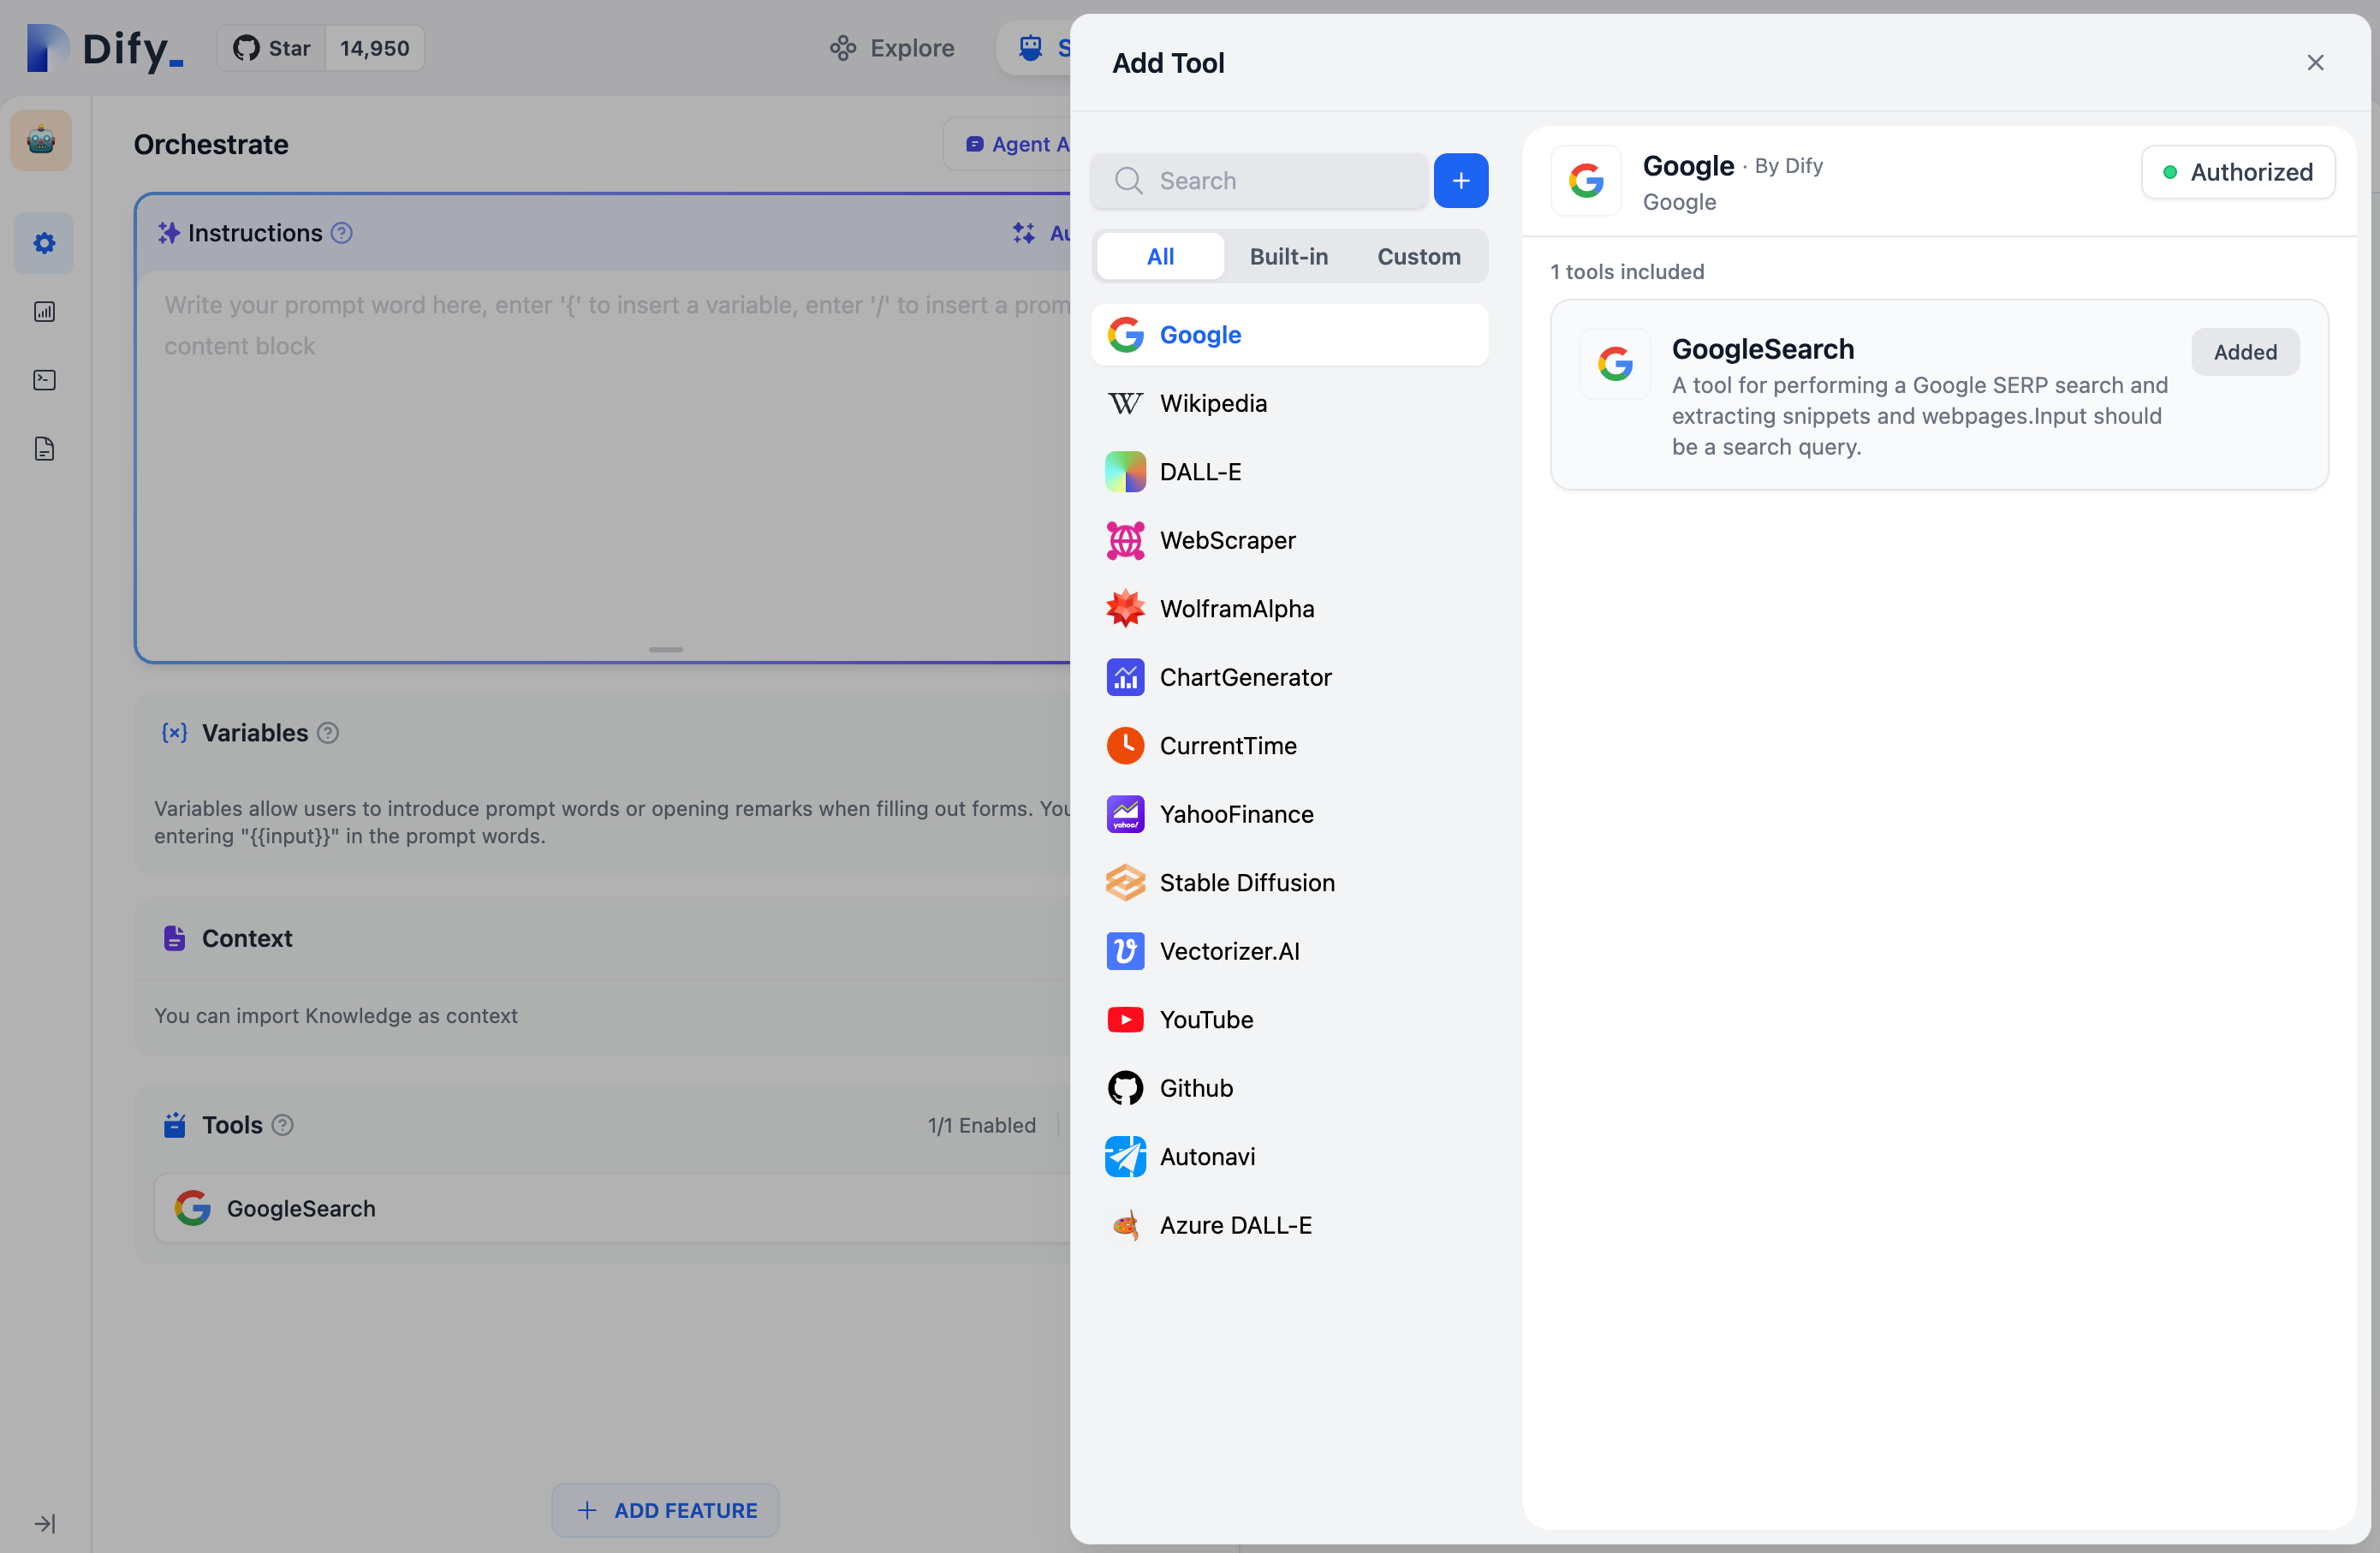
### Completion
After the above steps are completed, we can see this tool on the frontend, and it can be used in the Agent.
Of course, because google\_search needs a credential, before using it, you also need to input your credentials on the frontend.