Dify
简体中文
简体中文
  • 入门
    • 欢迎使用 Dify
      • 特性与技术规格
      • 模型供应商列表
    • 云服务
    • 社区版
      • Docker Compose 部署
      • 本地源码启动
      • 宝塔面板部署
      • 单独启动前端 Docker 容器
      • 环境变量说明
      • 常见问题
    • Dify Premium
    • Dify 教育版
  • 手册
    • 接入大模型
      • 增加新供应商
      • 预定义模型接入
      • 自定义模型接入
      • 接口方法
      • 配置规则
      • 负载均衡
    • 构建应用
      • 创建应用
      • 聊天助手
        • 多模型调试
      • Agent
      • 应用工具箱
        • 敏感内容审查
    • 工作流
      • 关键概念
      • 变量
      • 节点说明
        • 开始
        • LLM
        • 知识检索
        • 问题分类
        • 条件分支
        • 代码执行
        • 模板转换
        • 文档提取器
        • 列表操作
        • 变量聚合
        • 变量赋值
        • 迭代
        • 参数提取
        • HTTP 请求
        • Agent
        • 工具
        • 结束
        • 直接回复
        • 循环
      • 快捷键
      • 编排节点
      • 文件上传
      • 异常处理
        • 预定义异常处理逻辑
        • 错误类型
      • 附加功能
      • 预览与调试
        • 预览与运行
        • 单步调试
        • 对话/运行日志
        • 检查清单
        • 运行历史
      • 应用发布
      • 结构化输出
      • 变更公告:图片上传被替换为文件上传
    • 知识库
      • 创建知识库
        • 1. 导入文本数据
          • 1.1 从 Notion 导入数据
          • 1.2 从网页导入数据
        • 2. 指定分段模式
        • 3. 设定索引方法与检索设置
      • 管理知识库
        • 维护知识库内文档
        • 通过 API 维护知识库
      • 元数据
      • 在应用内集成知识库
      • 召回测试/引用归属
      • 知识库请求频率限制
      • 连接外部知识库
      • 外部知识库 API
    • 工具
      • 快速接入工具
      • 高级接入工具
      • 工具配置
        • Google
        • Bing
        • SearchApi
        • StableDiffusion
        • Dall-e
        • Perplexity Search
        • AlphaVantage 股票分析
        • Youtube
        • SearXNG
        • Serper
        • SiliconFlow (支持 Flux 绘图)
        • ComfyUI
    • 发布
      • 发布为公开 Web 站点
        • Web 应用的设置
        • 文本生成型应用
        • 对话型应用
      • 嵌入网站
      • 基于 APIs 开发
      • 基于前端组件再开发
    • 标注
      • 日志与标注
      • 标注回复
    • 监测
      • 集成外部 Ops 工具
        • 集成 LangSmith
        • 集成 Langfuse
        • 集成 Opik
      • 数据分析
    • 扩展
      • API 扩展
        • 使用 Cloudflare Workers 部署 API Tools
        • 敏感内容审查
      • 代码扩展
        • 外部数据工具
        • 敏感内容审查
    • 协同
      • 发现
      • 邀请与管理成员
    • 管理
      • 应用管理
      • 团队成员管理
      • 个人账号管理
      • 订阅管理
      • 版本管理
  • 动手实验室
    • 初级
      • 如何搭建 AI 图片生成应用
      • AI Agent 实战:搭建个人在线旅游助手
    • 中级
      • 使用文件上传搭建文章理解助手
      • 使用知识库搭建智能客服机器人
      • ChatFlow 实战:搭建 Twitter 账号分析助手
  • 社区
    • 寻求支持
    • 成为贡献者
    • 为 Dify 文档做出贡献
  • 插件
    • 功能简介
    • 快速开始
      • 安装与使用插件
      • 插件开发
        • 初始化开发工具
        • Tool 插件
        • Model 插件
          • 创建模型供应商
          • 接入预定义模型
          • 接入自定义模型
        • Agent 策略插件
        • Extension 插件
        • Bundle 插件包
      • 插件调试
    • 插件管理
    • 接口定义
      • Manifest
      • Endpoint
      • Tool
      • Agent
      • Model
        • 模型设计规则
        • 模型接口
      • 通用规范定义
      • 持久化存储
      • 反向调用 Dify 服务
        • App
        • Model
        • Tool
        • Node
    • 最佳实践
      • 开发 Slack Bot 插件
      • Dify MCP 插件指南:一键连接 Zapier 并自动发送邮件
    • 发布插件
      • 自动发布插件
      • 发布至 Dify Marketplace
        • 插件开发者准则
        • 插件隐私政策准则
      • 发布至个人 GitHub 仓库
      • 本地发布与分享
      • 第三方签名验证
    • 常见问题
  • 研发
    • 后端
      • DifySandbox
        • 贡献指南
    • 模型接入
      • 接入 Hugging Face 上的开源模型
      • 接入 Replicate 上的开源模型
      • 接入 Xinference 部署的本地模型
      • 接入 OpenLLM 部署的本地模型
      • 接入 LocalAI 部署的本地模型
      • 接入 Ollama 部署的本地模型
      • 接入 LiteLLM 代理的模型
      • 接入 GPUStack 进行本地模型部署
      • 接入 AWS Bedrock 上的模型(DeepSeek)
    • 迁移
      • 将社区版迁移至 v1.0.0
  • 阅读更多
    • 应用案例
      • DeepSeek 与 Dify 集成指南:打造具备多轮思考的 AI 应用
      • 本地私有化部署 DeepSeek + Dify,构建你的专属私人 AI 助手
      • 如何训练出专属于“你”的问答机器人?
      • 教你十几分钟不用代码创建 Midjourney 提示词机器人
      • 构建一个 Notion AI 助手
      • 如何在几分钟内创建一个带有业务数据的官网 AI 智能客服
      • 使用全套开源工具构建 LLM 应用实战:在 Dify 调用 Baichuan 开源模型能力
      • 手把手教你把 Dify 接入微信生态
      • 使用 Dify 和 Twilio 构建 WhatsApp 机器人
      • 将 Dify 应用与钉钉机器人集成
      • 使用 Dify 和 Azure Bot Framework 构建 Microsoft Teams 机器人
      • 如何让 LLM 应用提供循序渐进的聊天体验?
      • 如何将 Dify Chatbot 集成至 Wix 网站?
      • 如何连接 AWS Bedrock 知识库?
      • 构建 Dify 应用定时任务助手
      • 如何在 Dify 内体验大模型“竞技场”?以 DeepSeek R1 VS o1 为例
      • 在 Dify 云端构建 AI Thesis Slack Bot
      • 将 Dify 快速接入 QQ、微信、飞书、钉钉、Telegram、Discord 等平台
    • 扩展阅读
      • 什么是 LLMOps?
      • 什么是数组变量?
      • 检索增强生成(RAG)
        • 混合检索
        • 重排序
        • 召回模式
      • 提示词编排
      • 如何使用 JSON Schema 让 LLM 输出遵循结构化格式的内容?
    • 常见问题
      • 本地部署
      • LLM 配置与使用
      • 插件
  • 政策
    • 开源许可证
    • 用户协议
      • 服务条款
      • 隐私政策
      • 获取合规报告
Powered by GitBook
On this page
  • 背景
  • 概念简介
  • 环境准备
  • 参数与配置项说明
  • 安装配置步骤
  • 使用指南
  • 执行效果展示
  • 示例仓库
  1. 插件
  2. 发布插件

自动发布插件

Previous发布插件Next发布至 Dify Marketplace

Last updated 2 months ago

背景

当插件贡献者需要严肃更新 已被其他用户使用的 Dify 插件 时,流程通常非常繁琐:贡献者需要先修改插件源码并更新版本号,将更改推送到插件源码仓库,并在 fork 的 dify-plugin 仓库中创建新分支。随后,贡献者需要手动打包插件并上传打包文件,再创建 PR 合并到原始 dify-plugin 仓库。这个过程必须在每次插件代码变更时重复,非常耗时低效。

为了简化这一流程,我们构建了基于 GitHub Actions 的自动化工作流 Plugin Auto-PR。借助这个工具,插件贡献者可以一键完成插件打包、分支推送以及 PR 创建。

概念简介

GitHub Actions

GitHub Actions 是 GitHub 提供的内置 CI/CD 服务,可以自动化各种构建、测试和部署任务。

运行原理:当触发条件(如 push 代码)满足时,GitHub 会自动分配虚拟机运行你的工作流。所有操作都在 GitHub 云端完成。

Workflow

免费额度:

  • 公共仓库:无限制

  • 私有仓库:每月 2000 分钟

Plugin Auto-PR

运行原理:

  1. 当你推送代码到插件源码仓库的 main 分支时,触发工作流

  2. 工作流从 manifest.yaml 文件中读取插件信息

  3. 自动打包插件为 .difypkg 文件

  4. 将打包文件推送到你 fork 的 dify-plugins 仓库中

  5. 创建新分支并提交更改

  6. 自动创建 PR 请求合并到上游仓库

环境准备

仓库要求

  • 你已拥有自己的插件源码仓库(例如:your-name/plugin-source)

  • 你已拥有自己的 fork 插件仓库(例如:your-name/dify-plugins)

  • 你的 fork 仓库中已有插件目录结构:

dify-plugins/
└── your-author-name
    └── plugin-name

权限要求

此工作流需要适当的权限才能正常运行:

  • 你需要创建一个有足够权限的 GitHub Personal Access Token (PAT)

  • 该 PAT 必须有权向你的 fork 仓库推送代码

  • 该 PAT 必须有权向上游仓库创建 PR

参数与配置项说明

必要参数

插件自动发布工作流需要你正确配置以下关键元素:

manifest.yaml 文件:这是整个自动化流程的核心配置源。你需要确保以下字段正确无误:

  • name:插件名称(将用于生成包名和分支名)

  • version:版本号(每次更新时需要递增)

  • author:GitHub 用户名(用于确定目标仓库路径)

PLUGIN_ACTION Secret:你需要在插件源码仓库中正确设置此密钥。

  • 值要求:必须是具有足够权限的个人访问令牌(PAT)

  • 权限要求:能够推送分支到你的 fork 仓库,能够创建 PR 到上游仓库

自动生成的参数

工作流会自动处理以下内容,无需手动干预:

  • GitHub 用户名:从 manifest.yaml 的 author 字段读取

  • 作者文件夹名称:与 author 字段保持一致

  • 插件名称:从 manifest.yaml 的 name 字段读取

  • 分支名称:bump-{插件名}-plugin-{版本号}

  • 打包文件名:{插件名}-{版本号}.difypkg

  • PR 标题和内容:基于插件名称和版本自动生成

安装配置步骤

1

准备仓库

确保你已经 fork 了官方的 dify-plugins 仓库,并且有自己的插件源码仓库。

2

配置 Secret

导航到你的插件源码仓库,点击 Settings > Secrets and variables > Actions > New repository secret,创建 GitHub Secret:

  • 名称填写: PLUGIN_ACTION

  • 值填写: 拥有目标仓库(your-name/dify-plugins)写入权限的 GitHub Personal Access Token (PAT)

3

创建工作流文件

在仓库中创建 .github/workflows/目录,并在此目录中创建名为 plugin-publish.yml 的文件,再将以下内容复制到该文件中:

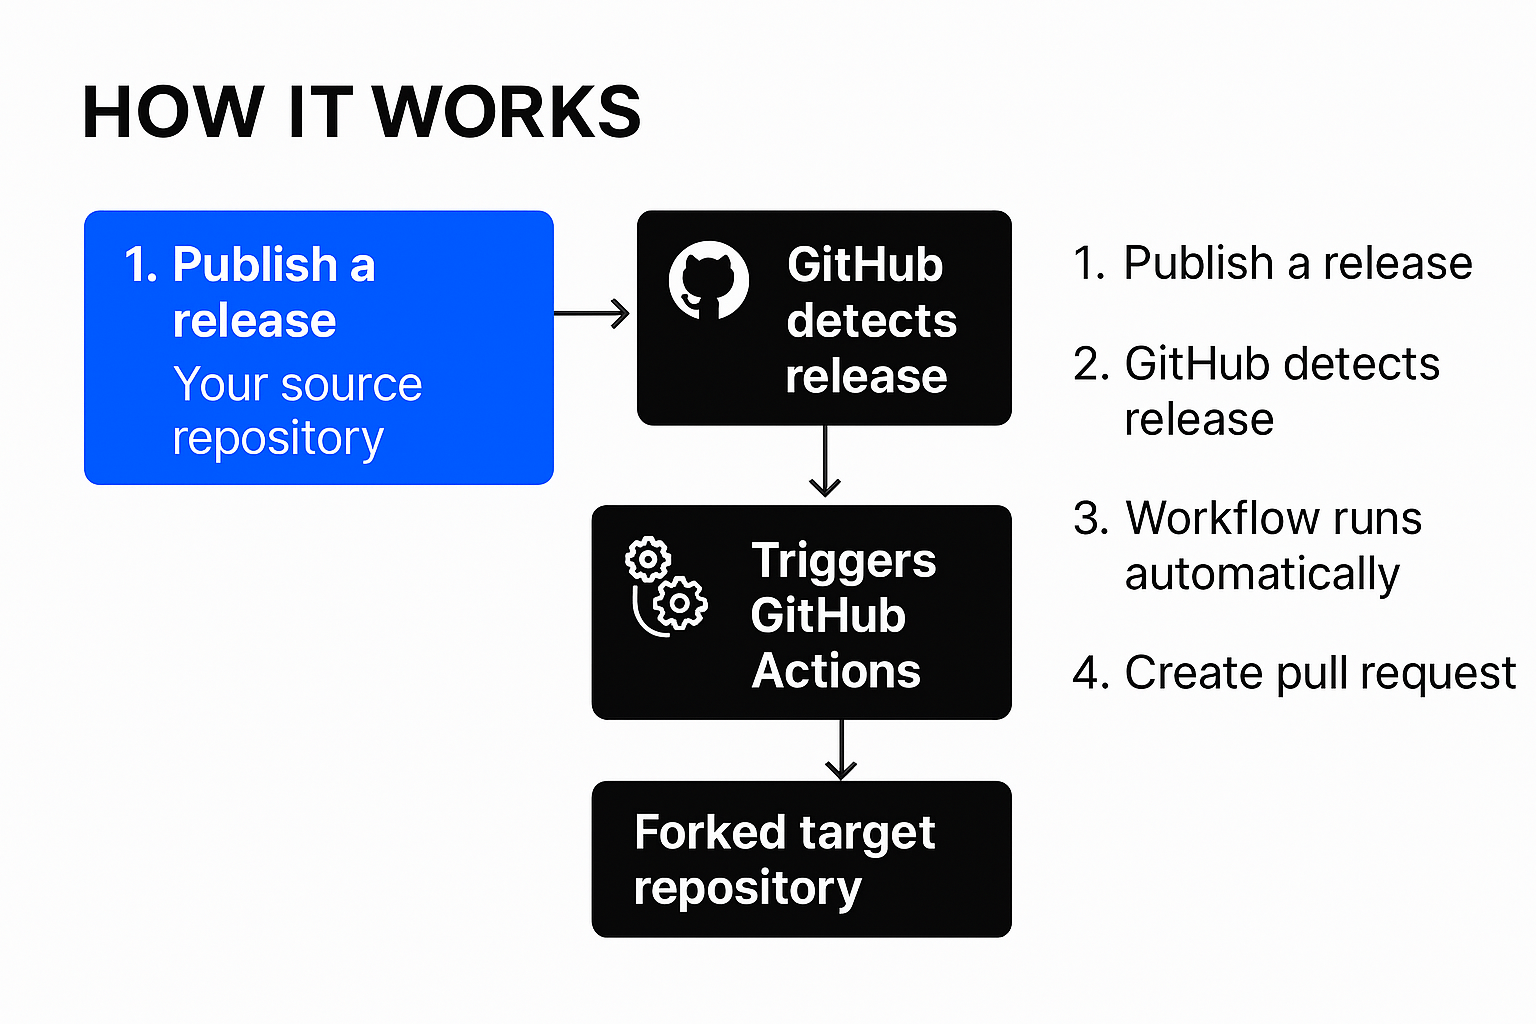
# .github/workflows/auto-pr.yml
name: Auto Create PR on Main Push

on:
  push:
    branches: [ main ]  # Trigger on push to main

jobs:
  create_pr: # Renamed job for clarity
    runs-on: ubuntu-latest
    steps:
      - name: Checkout code
        uses: actions/checkout@v3

      - name: Print working directory # Kept for debugging
        run: |
          pwd
          ls -la

      - name: Download CLI tool
        run: |
          # Create bin directory in runner temp
          mkdir -p $RUNNER_TEMP/bin
          cd $RUNNER_TEMP/bin

          # Download CLI tool
          wget https://github.com/langgenius/dify-plugin-daemon/releases/download/0.0.6/dify-plugin-linux-amd64
          chmod +x dify-plugin-linux-amd64

          # Show download location and file
          echo "CLI tool location:"
          pwd
          ls -la dify-plugin-linux-amd64

      - name: Get basic info from manifest # Changed step name and content
        id: get_basic_info
        run: |
          PLUGIN_NAME=$(grep "^name:" manifest.yaml | cut -d' ' -f2)
          echo "Plugin name: $PLUGIN_NAME"
          echo "plugin_name=$PLUGIN_NAME" >> $GITHUB_OUTPUT

          VERSION=$(grep "^version:" manifest.yaml | cut -d' ' -f2)
          echo "Plugin version: $VERSION"
          echo "version=$VERSION" >> $GITHUB_OUTPUT

          # If the author's name is not your github username, you can change the author here
          AUTHOR=$(grep "^author:" manifest.yaml | cut -d' ' -f2)
          echo "Plugin author: $AUTHOR"
          echo "author=$AUTHOR" >> $GITHUB_OUTPUT

      - name: Package Plugin
        id: package
        run: |
          # Use the downloaded CLI tool to package
          cd $GITHUB_WORKSPACE
          # Use variables for package name
          PACKAGE_NAME="${{ steps.get_basic_info.outputs.plugin_name }}-${{ steps.get_basic_info.outputs.version }}.difypkg"
          # Use CLI from runner temp
          $RUNNER_TEMP/bin/dify-plugin-linux-amd64 plugin package . -o "$PACKAGE_NAME"

          # Show packaging result
          echo "Package result:"
          ls -la "$PACKAGE_NAME"
          echo "package_name=$PACKAGE_NAME" >> $GITHUB_OUTPUT

          # Show full file path and directory structure (kept for debugging)
          echo "\\nFull file path:"
          pwd
          echo "\\nDirectory structure:"
          tree || ls -R

      - name: Checkout target repo
        uses: actions/checkout@v3
        with:
          # Use author variable for repository
          repository: ${{steps.get_basic_info.outputs.author}}/dify-plugins
          path: dify-plugins
          token: ${{ secrets.PLUGIN_ACTION }}
          fetch-depth: 1 # Fetch only the last commit to speed up checkout
          persist-credentials: true # Persist credentials for subsequent git operations

      - name: Prepare and create PR
        run: |
          # Debug info (kept)
          echo "Debug: Current directory $(pwd)"
          # Use variable for package name
          PACKAGE_NAME="${{ steps.get_basic_info.outputs.plugin_name }}-${{ steps.get_basic_info.outputs.version }}.difypkg"
          echo "Debug: Package name: $PACKAGE_NAME"
          ls -la

          # Move the packaged file to the target directory using variables
          mkdir -p dify-plugins/${{ steps.get_basic_info.outputs.author }}/${{ steps.get_basic_info.outputs.plugin_name }}
          mv "$PACKAGE_NAME" dify-plugins/${{ steps.get_basic_info.outputs.author }}/${{ steps.get_basic_info.outputs.plugin_name }}/

          # Enter the target repository directory
          cd dify-plugins

          # Configure git
          git config user.name "GitHub Actions"
          git config user.email "actions@github.com"

          # Ensure we are on the latest main branch
          git fetch origin main
          git checkout main
          git pull origin main

          # Create and switch to a new branch using variables and new naming convention
          BRANCH_NAME="bump-${{ steps.get_basic_info.outputs.plugin_name }}-plugin-${{ steps.get_basic_info.outputs.version }}"
          git checkout -b "$BRANCH_NAME"

          # Add and commit changes (using git add .)
          git add .
          git status # for debugging
          # Use variables in commit message
          git commit -m "bump ${{ steps.get_basic_info.outputs.plugin_name }} plugin to version ${{ steps.get_basic_info.outputs.version }}"

          # Push to remote (use force just in case the branch existed before from a failed run)
          git push -u origin "$BRANCH_NAME" --force

          # Confirm branch has been pushed and wait for sync (GitHub API might need a moment)
          git branch -a
          echo "Waiting for branch to sync..."
          sleep 10  # Wait 10 seconds for branch sync

      - name: Create PR via GitHub API
        env:
          GH_TOKEN: ${{ secrets.PLUGIN_ACTION }} # Use the provided token for authentication
        run: |
          gh pr create \
            --repo langgenius/dify-plugins \
            --head "${{ steps.get_basic_info.outputs.author }}:${{ steps.get_basic_info.outputs.plugin_name }}-${{ steps.get_basic_info.outputs.version }}" \
            --base main \
            --title "bump ${{ steps.get_basic_info.outputs.plugin_name }} plugin to version ${{ steps.get_basic_info.outputs.version }}" \
            --body "bump ${{ steps.get_basic_info.outputs.plugin_name }} plugin package to version ${{ steps.get_basic_info.outputs.version }}

            Changes:
            - Updated plugin package file" || echo "PR already exists or creation skipped." # Handle cases where PR already exists

      - name: Print environment info # Kept for debugging
        run: |
          echo "GITHUB_WORKSPACE: $GITHUB_WORKSPACE"
          echo "Current directory contents:"
          ls -R
4

更新 manifest.yaml

确保 manifest.yaml 文件正确设置以下字段:

version: 0.0.x  # Version number
author: your-github-username  # GitHub username/Author name
name: your-plugin-name  # Plugin name

使用指南

初次使用流程

首次设置自动发布工作流时,需要完成以下步骤:

  1. 确保你已经 fork 了官方的 dify-plugins 仓库

  2. 确保你的插件源码仓库结构正确

  3. 在插件源码仓库中设置 PLUGIN_ACTION Secret

  4. 创建工作流文件 .github/workflows/plugin-publish.yml

  5. 确保 manifest.yaml 文件中的 name 和 author 字段正确配置

后续更新流程

设置完成后,每次需要发布新版本时,只需:

  1. 修改插件代码

  2. 更新 manifest.yaml 中的 version 字段

  1. 将所有更改推送到 main 分支

  2. 等待 GitHub Actions 自动完成打包、分支创建和 PR 提交

执行效果展示

当你推送代码到插件源码仓库的 main 分支时,GitHub Actions 将自动执行发布流程:

  • 自动打包插件为 {plugin-name}-{version}.difypkg 格式

  • 自动将打包文件推送到目标仓库

  • 自动创建 PR 合并到 fork 仓库

示例仓库

Create Secrets
Release
Outcome

你可以参考,了解完整的配置细节和最佳实践。

示例仓库